Note
Access to this page requires authorization. You can try signing in or changing directories.
Access to this page requires authorization. You can try changing directories.
Use Durable Functions, a feature of Azure Functions, to write stateful functions in a serverless environment. Durable Functions manages state, checkpoints, and restarts in your application.
Durable Functions supports several storage providers, also known as backends, for storing orchestration and entity runtime state. In this quickstart, you create a Durable Functions app to use the Microsoft SQL Server (MSSQL) storage provider using Visual Studio Code.
This quickstart creates a .NET (isolated model) app for demonstration purposes. Content provided in this article applies to other languages in similar ways.
Note
The MSSQL backend was designed to maximize application portability and control over your data. It uses Microsoft SQL Server to persist all task hub data so that users get the benefits of a modern, enterprise-grade database management system (DBMS) infrastructure. To learn more about when to use the MSSQL storage provider, see the storage providers overview.
Migrating task hub data across storage providers currently isn't supported. Function apps that have existing runtime data start with a fresh, empty task hub after they switch to the MSSQL back end. Similarly, the task hub contents that are created by using MSSQL can't be preserved if you switch to a different storage provider.
Prerequisites
To complete this quickstart, you need:
Visual Studio Code installed.
Azure Functions Visual Studio Code extension installed.
The latest version of Azure Functions Core Tools installed.
.NET 8.0 SDK installed.
Docker installed.
An HTTP test tool that keeps your data secure. For more information, see HTTP test tools.
Create an Azure Functions project
In Visual Studio Code, create a local Azure Functions project.
On the View menu, select Command Palette (or select Ctrl+Shift+P).
At the prompt (
>), enter and then select Azure Functions: Create New Project.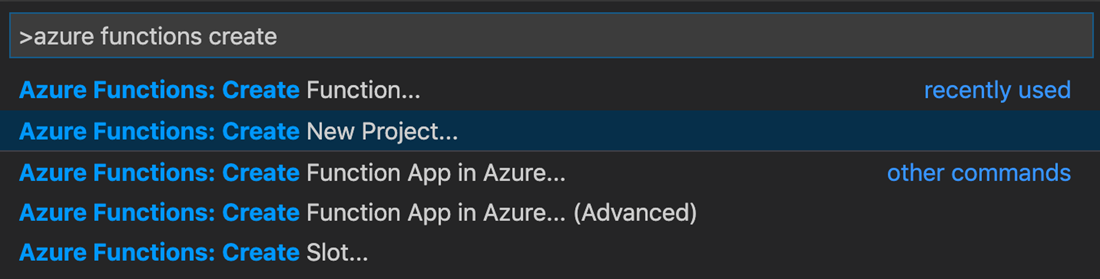
Select Browse. In the Select Folder dialog, go to a folder to use for your project, and then choose Select.
At the prompts, select or enter the following values:
Prompt Action Description Select a language for your function app project Select .NET Creates a local C# Functions project Select a .NET runtime Select .NET 8.0 isolated. Creates a Functions project that supports .NET 8 running in an isolated worker process and the Azure Functions Runtime 4.0. Select a template for your project's first function Select Durable Functions Orchestration. Creates a Durable Functions orchestration. Choose a durable storage type Select MSSQL. Selects the MSSQL storage provider. Provide a function name Enter HelloOrchestration. A name for the orchestration function. Provide a namespace Enter Company.Function. A namespace for the generated class. Select how you would like to open your project Select Open in current window. Opens Visual Studio Code in the folder you selected.
Visual Studio Code installs Azure Functions Core Tools if it's required to create the project. It also creates a function app project in a folder. This project contains the host.json and local.settings.json configuration files.
Another file, HelloOrchestration.cs, contains the basic building blocks of a Durable Functions app:
| Method | Description |
|---|---|
HelloOrchestration |
Defines the Durable Functions app orchestration. In this case, the orchestration starts, creates a list, and then adds the result of three functions calls to the list. When the three function calls finish, it returns the list. |
SayHello |
A simple function app that returns hello. This function contains the business logic that is orchestrated. |
HelloOrchestration_HttpStart |
An HTTP-triggered function that starts an instance of the orchestration and returns a check status response. |
For more information about these functions, see Durable Functions types and features.
Set up your database
Note
If you already have an MSSQL-compatible database, you can skip this section and skip the next section on setting up a Docker-based local database.
Because the MSSQL backend is designed for portability, you have several options to set up your backing database. For example, you can set up an on-premises SQL Server instance, use a fully managed instance of Azure SQL Database, or use any other SQL Server-compatible hosting option.
You can also do local, offline development by using SQL Server Express on your local Windows computer or use a SQL Server Docker image running in a Docker container.
This quickstart focuses on using a SQL Server Docker image.
Set up your local Docker-based SQL Server instance
Use the following PowerShell commands to set up a local SQL Server database on Docker. You can install PowerShell on Windows, macOS, or Linux.
# primary parameters
$pw        = "yourStrong(!)Password"
$edition   = "Developer"
$port      = 1433
$tag       = "2019-latest"
$dbname    = "DurableDB"
$collation = "Latin1_General_100_BIN2_UTF8"

# pull the image from the Microsoft container registry
docker pull mcr.microsoft.com/mssql/server:$tag

# run the image and provide some basic setup parameters
docker run --name mssql-server -e 'ACCEPT_EULA=Y' -e "MSSQL_SA_PASSWORD=$pw" -e "MSSQL_PID=$edition" -p ${port}:1433 -d mcr.microsoft.com/mssql/server:$tag

# wait a few seconds for the container to start...

# create the database with strict binary collation
docker exec -it mssql-server /opt/mssql-tools/bin/sqlcmd -S . -U sa -P "$pw" -Q "CREATE DATABASE [$dbname] COLLATE $collation"

# if sqlcmd is in the mssql-tools18 folder
# docker exec -it mssql-server /opt/mssql-tools18/bin/sqlcmd -C -S . -U sa -P "$pw" -Q "CREATE DATABASE [$dbname] COLLATE $collation"
You should now have a local SQL Server running on Docker and listening on port 1443. If port 1443 conflicts with another service, rerun these commands after changing the variable $port to a different value.
To validate your database installation, query your new SQL database:
docker exec -it mssql-server /opt/mssql-tools/bin/sqlcmd -S . -U sa -P "$pw" -Q "SELECT name FROM sys.databases"
If the database setup completed successfully, the name of your database (for example, DurableDB) appears in the command-line output:
name

--------------------------------------------------------------
master

tempdb

model

msdb

DurableDB
Note
To stop and delete a running container, you can use docker stop <containerName> and docker rm <containerName> respectively. You can use these commands to re-create your container and to stop the container when you finish this quickstart. For more assistance, run docker --help.
Troubleshooting
If you run into "Error response from daemon: OCI runtime exec failed" when running docker exec to create the database, it's likely the folder /opt/mssql-tools/bin/sqlcmd does not exist. Open Docker Desktop, select your SQL Server Docker container, select Files and browse for the mssql-tools folder. Check if this folder has a different name, such as /opt/mssql-tools18/bin/sqlcmd. Update the command accordingly.
In ODBC Driver 18 for SQL Server, the Encrypt connection option is set to true by default. If you run into "error:1416F086:SSL routines:tls_process_server_certificate:certificate verify failed:self signed certificate" when running docker exec to perform database operations, append -C, which is equivalent to the ADO.net option TRUSTSERVERCERTIFICATE = true.
Add SQL connection string to local.settings.json
The MSSQL backend needs a connection string to access your database. How to obtain a connection string depends primarily on your specific MSSQL server provider.
If you use the preceding Docker commands without changing any parameters, your connection string is:
Server=localhost,1433;Database=DurableDB;User Id=sa;Password=yourStrong(!)Password;
In local.settings.json, assign the connection string of the Docker-based SQL server instance to SQLDB_Connection. This variable was added by Visual Studio Code when you picked MSSQL as the backend for your Durable Functions app:
{
  "IsEncrypted": false,
  "Values": {
    "AzureWebJobsStorage": "UseDevelopmentStorage=true",
    "SQLDB_Connection": "Server=localhost,1433;Database=DurableDB;User Id=sa;Password=yourStrong(!)Password;",
    "FUNCTIONS_WORKER_RUNTIME": "<dependent on your programming language>"
  }
}
Test locally
Open a termimal window in your app's root folder and run azurite start. Azurite is the Azure Storage emulator, which is needed for running any Function app.
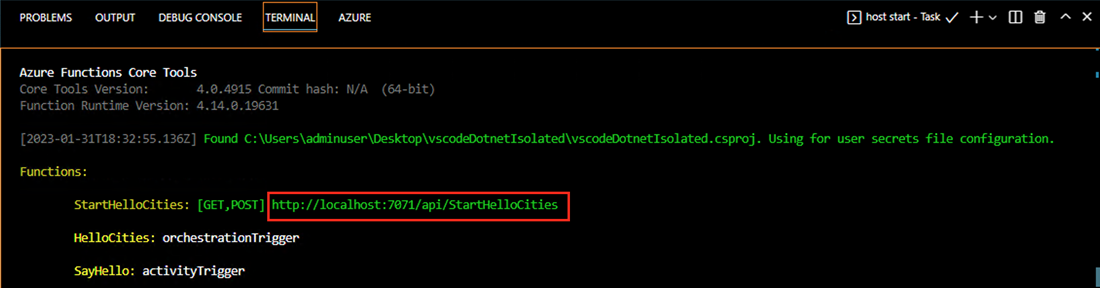
Open another terminal window in your app's root folder and start the Function app by running func host start.
In the terminal window, copy the URL endpoint of your HTTP-triggered function.
Use an HTTP test tool to send an HTTP POST request to the URL endpoint.
The response is the HTTP function's initial result. It lets you know that the Durable Functions orchestration started successfully. It doesn't yet display the end result of the orchestration. The response includes a few useful URLs.
Copy the URL value for
statusQueryGetUri, paste it in your browser's address bar, and execute the request. Alternatively, you can also continue to use the HTTP test tool to issue the GET request.The request queries the orchestration instance for the status. You should see that the instance finished and that it includes the outputs or results of the Durable Functions app like in this example:
{
    "name":"HelloCities",
    "instanceId":"7f99f9474a6641438e5c7169b7ecb3f2",
    "runtimeStatus":"Completed",
    "input":null,
    "customStatus":null,
    "output":"Hello, Tokyo! Hello, London! Hello, Seattle!",
    "createdTime":"2023-01-31T18:48:49Z",
    "lastUpdatedTime":"2023-01-31T18:48:56Z"
}

Run your app in Azure
To run your app in Azure, you need to create various resources. For convenient clean up later, create all the resources in the same resource group.
Create an Azure SQL database
Note
If you already have an Azure SQL database or another publicly accessible SQL Server instance that you would like to use, you can go to the next section.
Refrain from enabling the Allow Azure services and resources to access this [SQL] server setting for production scenarios. Real applications should implement more secure approaches, such as stronger firewall restrictions or virtual network configurations.
In the Azure portal, you can create an Azure SQL database. During creation:
- Enable Azure services and resources to access this server (under Networking)
- Set the value for Database collation (under Additional settings) to
Latin1_General_100_BIN2_UTF8.
Create an Azure Functions app and supporting resources
Open a terminal window and sign in to Azure:
az loginCreate the following resources in the same resource group and region as your SQL database:
- A general-purpose storage account, which is used to store important app data, such as the application code itself. Storage account names must contain three to 24 characters numbers and lowercase letters only.
- A premium function app plan
- A function app
# Variables
location=<REGION>
resourceGroup=<RESOURCE_GROUP_NAME>
storage=<STORAGE_NAME>
planName=<PREMIUM_PLAN_NAME>
functionApp=<APP_NAME>
skuStorage="Standard_LRS"
skuPlan="EP1"
functionsVersion="4"

# Create an Azure storage account
echo "Creating $storage"
az storage account create --name $storage --location "$location" --resource-group $resourceGroup --sku $skuStorage --allow-blob-public-access false

# Create a premium plan
echo "Creating $premiumPlan"
az functionapp plan create --name $planName --resource-group $resourceGroup --location "$location" --sku $skuPlan

# Create a function app hosted in the premium plan
echo "Creating $functionApp"
az functionapp create --name $functionApp --storage-account $storage --plan $planName --resource-group $resourceGroup --functions-version $functionsVersion
Create an Azure managed identity
Managed identities make your app more secure by eliminating secrets from your app, such as credentials in the connection strings. You can choose between system-assigned and user-assigned managed identity. This quickstart demonstrates setting up user-assigned managed identity, which is the recommended option as it is not tied to the app lifecycle.
The following commands create the identity resource and assign it to the app:
# Variables
subscription=<SUBSCRIPTION_ID>
identity=<IDENTITY_NAME>

# Create a managed identity resource
echo "Creating $identity"
az identity create -g $resourceGroup -n $identity --location "$location"

# Construct the identity resource ID
resourceId="/subscriptions/$subscription/resourceGroups/$resourceGroup/providers/Microsoft.ManagedIdentity/userAssignedIdentities/$identity"

# Assign the identity to the Azure Functions app
echo "Assigning $identity to app"
az functionapp identity assign -g $resourceGroup -n $functionApp --identities "$resourceId"

# Get the identity's ClientId and PrincipalId (also called ObjectId) for a later step.
clientId=$(az identity show --name $identity --resource-group $resourceGroup --query 'clientId' --output tsv)

principalId=$(az identity show --name $identity --resource-group $resourceGroup --query 'principalId' --output tsv)
Grant access to Azure Storage and Azure SQL Database
Azure Storage
Assign the identity Storage Blob Data Owner role for access to the storage account.
# Set the scope of the access
scope="/subscriptions/$subscription/resourceGroups/$resourceGroup/providers/Microsoft.Storage/storageAccounts/$storage"

# Assign the role
echo "Assign Storage Blob Data Owner role to identity"
az role assignment create --assignee "$clientId" --role "Storage Blob Data Owner" --scope "$scope"
Azure SQL Database
Note
Authenticating to Azure SQL database using managed identity is not supported when hosting a Durable Functions app in the Flex Consumption plan. If your app is hosted in the Flex Consumption plan, skip to the set app settings section.
Start by setting your developer identity as the database's admin.
The assignee is your identity, so change to your email:
assignee=$(az ad user show --id "[email protected]" --query "id" --output tsv)Set assignee as admin of the Azure SQL database:
az sql server ad-admin create --resource-group $resourceGroup --server-name <SQL_SERVER_NAME> --display-name ADMIN --object-id "$assignee"Connect to the SQL database created previously using tools such as Azure Data Studio or SQL Management Server Studio. Or you can run the following SQLCMD command to connect:
sqlcmd -S <SQL_SERVER_NAME>.database.windows.net -d <DATABASE_NAME> -U <[email protected]> -P "ACCOUNT_PASSWORD" -G -l 30Grant your identity db_owner access by running the following query against the database. The
IDENTITY_OBJECT_IDis the PrincipalId from the identity creation step.CREATE USER "<IDENTITY_NAME>" FROM EXTERNAL PROVIDER With OBJECT_ID='<IDENTITY_OBJECT_ID>' ALTER ROLE db_owner ADD MEMBER "<IDENTITY_NAME>"; GOConnect to the
masterdatabase and grant your identity dbmanager access:CREATE USER "<IDENTITY_NAME>" FROM EXTERNAL PROVIDER With OBJECT_ID='<IDENTITY_OBJECT_ID>' ALTER ROLE dbmanager ADD MEMBER "<IDENTITY_NAME>"; GO
Set required app settings
You need to add the following app settings to your app:
AzureWebJobsStorage__accountName: Azure Storage account nameAzureWebJobsStorage__clientId: ClientId of the managed identityAzureWebJobsStorage__credential: Credential type, which is managedidentitySQLDB_Connection: SQL database connection string
If you're using user-assigned managed identity to authenticate to the SQL database, the connection string should look like the following:
dbserver=<SQL_SERVER_NAME>
sqlDB=<SQL_DB_NAME>
clientId=<IDENTITY_CLIENT_ID>

sqlconnstr="Server=tcp:$dbserver.database.windows.net,1433;Initial Catalog=$sqlDB;Persist Security Info=False;User ID=$clientId;MultipleActiveResultSets=False;Encrypt=True;TrustServerCertificate=False;Authentication='Active Directory Managed Identity';"
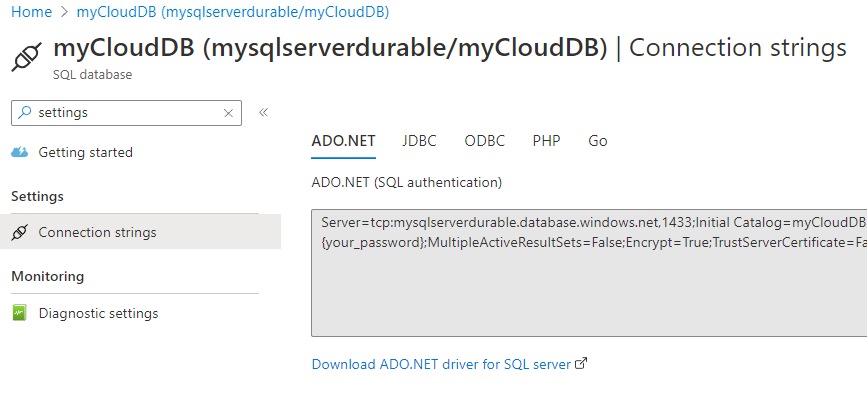
For Flex Consumption apps, use a connection string to authenticate for now. You can find it by going to the SQL database resource on Azure portal, navigating to the Settings tab, then clicking on Connection strings:
The connection string should have this format:
dbserver=<SQL_SERVER_NAME>
sqlDB=<SQL_DB_NAME>
username=<DB_USER_LOGIN>
password=<DB_USER_PASSWORD>

sqlconnstr="Server=tcp:$dbserver.database.windows.net,1433;Initial Catalog=$sqlDB;Persist Security Info=False;User ID=$username;Password=$password;MultipleActiveResultSets=False;Encrypt=True;TrustServerCertificate=False;Connection Timeout=30;"
Run the following command to set the settings:
az functionapp config appsettings set --name $functionApp --resource-group $resourceGroup --settings AzureWebJobsStorage__accountName="$storage" AzureWebJobsStorage__clientId="$clientId" AzureWebJobsStorage__credential="managedidentity" SQLDB_Connection=$sqlconnstr
Delete the existing AzureWebJobsStorage setting:
az functionapp config appsettings delete --name $functionApp --resource-group $resourceGroup --setting-names "AzureWebJobsStorage"
Deploy the local project to Azure and test
Finally, in your root project folder, deploy your app to Azure by running:
func azure functionapp publish $functionApp
After deployment finishes, run the following to get the HTTP trigger URL:
az functionapp function list --resource-group $resourceGroup --name $functionApp --query '[].{Function:name, URL:invokeUrlTemplate}' --output json
Test just as you did during local development with an HTTP test tool.
You can also validate that the MSSQL backend is correctly configured by querying the database for task hub data.
For example, you can query your orchestration instances on your SQL database's overview pane. Select Query Editor, authenticate, and then run the following query:
SELECT TOP 5 InstanceID, RuntimeStatus, CreatedTime, CompletedTime FROM dt.Instances
After you run a simple orchestrator, you should see at least one result, as shown in this example:

Next steps
- Host a Durable Functions app using the MSSQL backend in Azure Container Apps.
- See the MSSQL storage provider documentation for more information about this backend's architecture, configuration, and workload behavior.