Note
Access to this page requires authorization. You can try signing in or changing directories.
Access to this page requires authorization. You can try changing directories.
Use the following steps to use DevTools as an IDE, such as making webpage edits in the Sources tool's Workspace tab, saving changes to the source files on disk.
You can read or follow these steps that show how to set up and using a workspace in DevTools. After you set up a workspace, the changes that you make to the files in the workspace, by using DevTools, are saved on your local computer.
Step 1: Clone the Edge Demos repo to your local drive
First, you set up a local directory that contains the source files for the webpage, such as the Workspaces demo webpage.
Clone the MicrosoftEdge / Demos repo to your local drive, including the /workspaces/ demo folder, as follows:
If not done already, Download git and install it.
Go to MicrosoftEdge / Demos in a new window or tab.
Click the Code drop-down button, and then click the Copy url to clipboard button.
The URL is copied to the clipboard:
https://github.com/MicrosoftEdge/Demos.gitOr, if you have GitHub Desktop installed, click Open with GitHub Desktop to clone the repo, and skip the command prompt step below.
Or, you can use Visual Studio Code's Source Control pane to clone the repo, and skip the command prompt step below.
Open a command prompt, such as git bash.
Clone the repo to your local drive, entering the URL string that you copied from the GitHub repo. If you use the git bash command prompt:
# Example location where the repo directory will be added:
cd ~/GitHub
git clone https://github.com/MicrosoftEdge/Demos.git
For details about cloning a repo, see:
- Cloning a repository - GitHub docs.
Continue with the next section.
Step 2: Start the localhost server in the webpage source files directory
If not done already, install an up-to-date version of Node.js and npm from Node.js.
See also:
- Install Node.js and Node Package Manager (npm) in Installing the DevTools extension for Visual Studio Code.
Go to a command prompt, such as the git bash shell, or the Terminal pane in Microsoft Visual Studio Code.
Change to the
Demosrepo directory'sworkspacesdirectory:cd ~/GitHub/Demos/workspaces pwdA directory for use with the Sources tool's Workspace tab can have any name. This demo directory is named
/workspaces/.Create a working branch named "test" and switch to it (to avoid altering the demo's files in the "main" branch):
git checkout -b testThat's equivalent to:
git branch test
git switch test
Run one of the following commands, to start the web server:
# Node.js option
npx http-server
For more information and options, see Start the server (npx http-server) in Installing the DevTools extension for Visual Studio Code.
# Python 2 option
cd ~/GitHub/demos/workspaces
python -m SimpleHTTPServer
# Python 3 option cd ~/GitHub/demos/workspaces python -m http.serverOpen a tab in Microsoft Edge, and go to the locally hosted version of the site. You typically access it by going to
localhost:8080:
Another common equivalent URL is
http://0.0.0.0:8080. The default port number for the Python server option is8000. The exact port number might be different.The DevTools Workspaces Demo webpage opens.
(The link in the latest demo might say either "Edit file with workspaces" or "Edit and save files in a workspace (Sources tool Workspace tab)".)
See also:
- Running a simple local HTTP server in How do you set up a local testing server? at MDN - shows Python.
Continue with the next section.
Step 3: Add a Workspace folder in the Sources tool
Next, define a Workspace in DevTools:
Right-click the locally hosted DevTools Workspaces Demo webpage and then select Inspect. Or, press Ctrl+Shift+J (Windows, Linux) or Command+Option+J (macOS).
DevTools opens.
Click the Sources (
 ) tab.
In the Navigator pane (on the left), click the Workspace tab (which is grouped with the Page tab):

Click Add folder button.
The Select Folder dialog opens.
Go to the cloned
/Demos/workspace/directory that you created. For example, in the Folder: text box, enter the path, such asC:\Users\localAccount\GitHub\Demos\workspaces\.Click the Select Folder button.
DevTools prompts you whether to grant DevTools full access to your
/workspaces/directory.Click the Allow button, to give DevTools permission to read and write to the directory.
In the Workspace tab are page icons that have a green "mapped" dot, for
index.html,script.js, andstyles.css. The green "mapped" dot indicates that DevTools has established a mapping between a network resource of the page that's received from the web server, and the local source file in your/Demos/workspace/directory:
Continue with the next section.
Step 4: Save a CSS change to disk (via Elements tool Styles tab)
Next, you edit CSS and save changes to the source file. We here use the Elements tool's Styles tab, assisted by its user interface controls, though we could directly edit the CSS file in the Sources tool's Workspace tab's file editor.
To make a change in the CSS file and save it to disk by using the Elements tool's Styles tab:
In the Sources tool, in the Workspace tab (grouped with the Page tab), select
styles.cssto open it in the editor pane. Thecolorproperty of theh1element is set tofuchsia:
Select the Elements (
 ) tool; then in the DOM tree, expand the
 <body>element; and then select the<h1>element.The Styles pane displays the CSS rules that are applied to the
<h1>element. The mapped file ( ) icon next to
 styles.css:1is a page with a green "mapped" dot. The green "mapped" dot means that any changes that you make to this CSS rule are mapped tostyles.cssin your/Demos/workspace/directory:
Change the value of the
colorproperty of the<h1>element to orange. To do this, select the<h1>element in the DOM Tree. In the CSS rule forh1, clickfuchsia, start typing orange, and then select orange from the color list:
Select the Sources tool, right-click
styles.css, and then select Open in containing folder.File Explorer or Finder opens.
Open the copy of
styles.cssthat's in your/Demos/workspace/directory in a text editor, such as Visual Studio Code. Thecolorproperty is now set to the new color, which is orange in this example. The change was not only made in the copy of the file returned from the web server; the change was also made in your mapped file in your/Demos/workspace/workspace directory.Refresh the page.
The color of the <h1> element is still set to the new color. The change remains across a refresh, because when you made the change, DevTools saved the change to disk. When you refreshed the page, your local server served the modified copy of the file from disk.
Tip: You can also change the color by clicking the fucshia-colored swatch to open the color picker to pick a new color. The HEX value for the color you pick is the color name.
Continue with the next section.
Step 5: Save an HTML change to disk (via Sources tool Workspace tab)
Next, edit HTML and save changes to the source file. To save changes to the webpage HTML file, add the source code folder in the Sources tool's Workspace tab, and then edit the HTML in the Sources tool. (Changes aren't made to the source file by merely changing the HTML in the DOM tree in the Elements tool.)
The DevTools Workspace tab is similar to using an editor to edit the HTML source file, but enables editing the HTML source file directly within DevTools.
Continuing from above, in DevTools, click the Sources (
) tab.In the Navigator pane on the left, in the Workspace tab (grouped with the Page tab), select
index.html.The index.html tab opens in the Sources tool.
In the the
<h1>tag, replace "DevTools Workspaces Demo" with "I Love Cake".An asterisk appears next to
index.html.Press Ctrl+S (Windows, Linux) or Command+S (macOS).
Your change is saved, and the asterisk disappears.
You made the change in the file listing, rather than in the DOM tree in the Elements tool.
Refresh the page. The heading in the rendered page changes to "I Love Cake", because that string was saved in
index.htmlin your mapped/Demos/workspace/directory:
In the Sources tool, right-click
index.html, and then select Open in containing folder.File Explorer or Finder opens.
Open the copy of
index.htmlthat's in your/Demos/workspace/directory in a text editor, such as Visual Studio Code.The
<h1>element contains the new text, "I Love Cake", because you made the change using the Sources tool's editor to editindex.htmland then saved the change, and that file was mapped in a workspace (the Workspace tab), indicated by a green "mapped" dot on the file's icon.Many developers don't write HTML directly, but instead use approaches such as:
- A server-side language, such as Java, Python, or PHP.
- A site generator, such as Eleventy.
- A client-side framework that uses JavaScript code.
- A markup language other than HTML, such as Markdown.
This means that in practice, few developers change HTML files in the Workspace tab. Most devs produce HTML files by using a different type of source file, such as a React component JS source file, and then rebuild and reload (which may happen automatically).
Long-click or right-click the Refresh button in Microsoft Edge, and then select Hard refresh (Ctrl+Shift+R).
In the Workspace tab, green "mapped" dots appear on all the HTML, CSS, and JS files.
Continue with the next section.
Step 6: Save a JavaScript change to disk
Continuing from above, next, you'll edit the Workspace demo's JavaScript file and save changes to the source file. To save edits to a JavaScript source file, you can use DevTools like an IDE, after adding the source code folder in the Workspace tab of the Sources tool. You can then edit and save the JavaScript file in the Sources tool's editor.
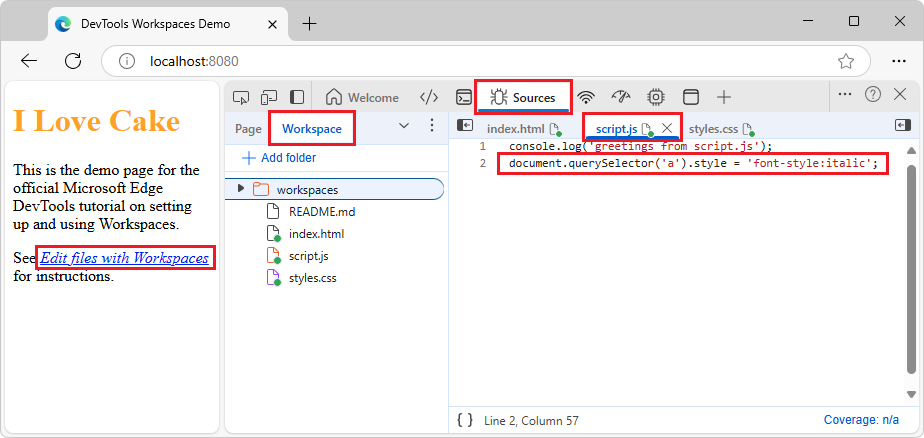
In the rendered demo webpage, to style the Edit and save files in a workspace (Sources tool Workspace tab) hyperlink with italics:
In DevTools, select the Sources tool, and then select the Workspace tab, which is grouped with the Page tab.
In the Workspace tab, select
script.js.script.jsopens in a tab within the editor pane of the Sources tool.In the editor pane, add the following code to the bottom of script.js:
document.querySelector('a').style = 'font-style:italic';An asterisk appears on the
script.jstab.Press Ctrl+S (Windows, Linux) or Command+S (macOS).
script.jsis saved, and the asterisk is removed from thescript.jstab.Refresh the page.
If there's no longer a green "mapped" dot on the HTML, JS, or CSS file, long-click or right-click the Refresh button in Microsoft Edge, and then select Hard refresh (Ctrl+Shift+R).
The Edit files with Workspaces (or Edit and save files in a workspace (Sources tool Workspace tab)) hyperlink on the page is now italicized:
Continue with the next section.
Step 7: Add a .js file using DevTools
In the Sources tool, in the Workspace tab, right-click the
/workspaces/folder, and then select the New file menuitem.A file named
NewFileis added:
Right-click
NewFilein the Workspace tab and then select Rename.Rename the file to
test.js.In
test.js, add the line:console.log('hello from test.js');In the Sources tool, in the Workspace tab, select
index.html.In
index.html, below the line<script src="./script.js" defer></script>, add the line:<script src="./test.js" defer></script>Press Ctrl+S (Windows, Linux) or Command+S (macOS).
index.htmlis saved.Long-click or right-click the Refresh button in Microsoft Edge, and then select Hard refresh (Ctrl+Shift+R).
In the Workspace tab, green "mapped" dots appear on all the HTML, CSS, and JS files:

This completes the tutorial.
If you want to revert the edits in your /workspace/ folder, you can use git commands at a command prompt, or use GitHub Desktop, to revert the changes in the current branch, such as "main" or "test".
See also
- Edit and save files in a workspace (Sources tool Workspace tab)
- Get started viewing and changing CSS
- Get started debugging JavaScript
Note
Portions of this page are modifications based on work created and shared by Google and used according to terms described in the Creative Commons Attribution 4.0 International License. The original page is found here and is authored by Kayce Basques.
![]() This work is licensed under a Creative Commons Attribution 4.0 International License.
This work is licensed under a Creative Commons Attribution 4.0 International License.