Note
Access to this page requires authorization. You can try signing in or changing directories.
Access to this page requires authorization. You can try changing directories.
In Copilot Studio, you can extend an agent's capabilities by calling external REST APIs using the HTTP Request node. This call can be helpful when you need to retrieve data from an external system or manipulate data on that system.
Prerequisites
Use the HTTP Request node
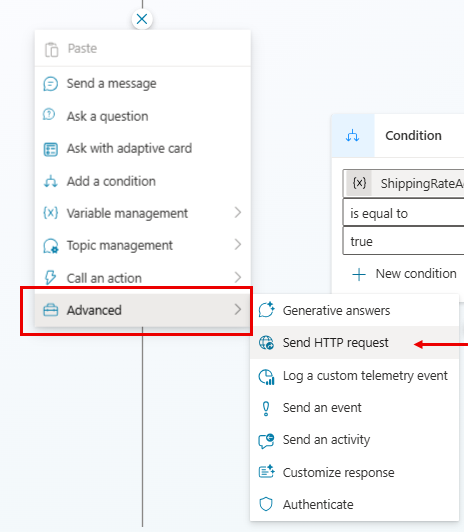
Select Add node (+), open the Advanced sub menu, and then select Send HTTP request.
In the URL box, enter the URL for the API endpoint you want to call.
Select the appropriate request Method from the dropdown. GET, POST, PATCH, PUT, and DELETE methods are supported.

Under Headers and body on the node, select the Edit button, which opens the HTTP Request properties panel.
You can optionally add one or more headers to the HTTP request. Select the Add button to add each header's key and value.

By default, no content is sent in the body of the HTTP request, but you can specify content in the body.
On the node, choose the Response data type from the available options.
You can provide an example JSON response, which you can usually find in the documentation for the API you're calling. It generates a Power Fx variable, allowing you to use it elsewhere in your authoring canvas, with intellisense support in the Power Fx editor. Select From Sample Data and then select Get schema from sample JSON. Paste your sample response into the editor and select Confirm.
Under Save user response as choose where you want the HTTP request response to be stored, either creating a new variable or selecting an existing one.
Send content in the HTTP request body
Under Headers and body on the node, select the Edit button, which opens the HTTP Request properties panel.
Under Body, select the appropriate content type. By default, Body is set to No Content, where no content should be present within the request body, which is most commonly used with the GET request. To add content to the body, select from one of the available options.

JSON Content: JSON content allows you to provide a JSON object in the request body. This object is often used when making POST or PUT requests. When this option is selected, an editor allows you to enter your JSON content.
You can also specify your JSON content using Power Fx, allowing you to include dynamic values and reference variables. Select the Edit JSON button, choose Formula, and then enter a Power Fx object (any existing JSON that was entered is converted into a Power Fx object for you), which is converted into JSON when the HTTP request is made.

Raw content: Raw content lets you insert a string of data into the request body, and this string can be of any content type you specify. Raw content is entered using a Power Fx formula, such as the string content shown in the following example.

Error handling and time out
The HTTP Request node has multiple options for handling situations where the HTTP request might fail or return an error.
By default, the feature raises an error. This means that when an HTTP request returns an error or fails to execute, the agent stops its operation and triggers the On Error system topic, displaying an error message.
However, you can configure the error handling to not trigger the On Error system topic. Instead, you can make it store the HTTP status code and any error response body into variables that you specify. You can interrogate these variables as needed, and the topic can continue to run. This configuration is useful in scenarios where you want the agent to continue operation, even if a particular HTTP request fails.
To configure the error handling behavior of an HTTP Request node:
Under Headers and body, select Edit. The HTTP Request properties panel appears.
Under Error handling, select the desired behavior: Raise an error, or Continue on error.
If you select Continue on error, configure variables for the status code and error response body.

In this example, if the HTTP request fails, the agent stores the HTTP status code in the Topic.StatusCode variable, and the response body in the Topic.ErrorResponse variable. The agent continues to its next steps in the topic.
The Error response variable type is Any. You can use a Parse value node to convert this variable into a Power Fx record.
In the HTTP Request properties panel, you can also set a Request timeout property, in milliseconds. The default value is 30 seconds.