Note
Access to this page requires authorization. You can try signing in or changing directories.
Access to this page requires authorization. You can try changing directories.
This article shows you how to add an Azure Data Explorer DB source to an eventstream.
Azure Data Explorer is a fully managed, high-performance platform that delivers real-time insights from massive streaming data. Microsoft Fabric event streams enable you to connect to an Azure Data Explorer database, stream the data from its tables, and route them to various destinations within Fabric.
Note
This source isn't supported in the following regions of your workspace capacity: West US3, Switzerland West.
Prerequisites
Before you start, you must complete the following prerequisites:
- Access to the Fabric premium workspace with Contributor or higher permissions.
- Ensure that you have an active Azure subscription and an Azure Data Explorer cluster with at least one database deployed.
- Ensure that you have the required permissions to access the Azure Data Explorer cluster.
- Ensure that the Azure Data Explorer cluster is publicly accessible and not restricted by a firewall or a virtual network.
Note
The maximum number of sources and destinations for one eventstream is 11.
Add Azure Data Explorer DB as a source
If you haven't added any source to your eventstream yet, select Use external source tile.

If you're adding the source to an already published eventstream, switch to Edit mode, select Add source on the ribbon, and then select External sources.

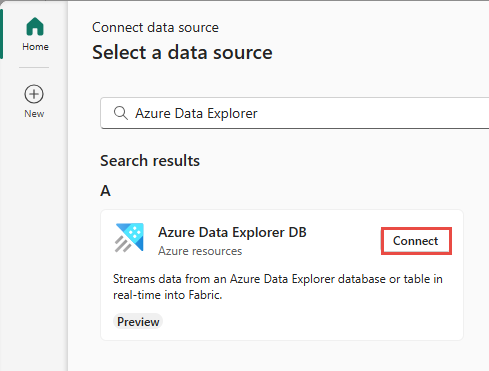
On the Select a data source page, search for and select Connect on the Azure Data Explorer DB tile.
Configure and connect to Azure Data Explorer DB
On the Configure connection settings page, select New connection.

In the Connection settings section of the popup window, do these steps:
For Cluster, enter the Cluster URI of your Azure Data Explorer cluster.
For Database, enter your database name.
For Table, enter single or multiple table names.
Note
Database and table in the cloud connection aren't mandatory, as you can also specify them later in the next step of the wizard. The Cluster is required.
For Connection name, enter a name for the connection to the Azure Data Explorer Cluster.
For Authentication kind, only Organizational account is currently supported.
Then, select Connect.

Now, on Configure connection settings page, follow these steps if you didn't specify the database and tables in the connection settings earlier.
For Database, enter the name of your database.
Then, enter names of tables (one or more).
Note
The Database and table names configured in this step take precedence over the settings you set in the cloud connection settings you configured earlier.

If you're using Real-Time hub, follow these steps. Otherwise, move to the next step.
In the Stream details section to the right, select the Fabric workspace where you want to save the eventstream that the Wizard is going to create.
For eventstream name, enter a name for the eventstream. The wizard creates an eventstream with the selected Azure Database Explorer table as a source.
The Stream name is automatically generated for you by appending -stream to the name of the eventstream. You can see this stream on the Real-time hub All data streams page when the wizard finishes.

If you're using the Eventstream editor to add an Azure Data Explorer database table as a source to an event stream, select pencil button under Source name, and enter a source name.

Select Next at the bottom of the page.
On the Review + connect page, review settings, and select Connect (Fabric Real-Time hub) or Add (Fabric Eventstream).

View updated eventstream
You see that the Azure Data Explorer DB source is added to your eventstream on the canvas in the Edit mode. To implement this newly added Azure Data Explorer DB source, select Publish.

After you complete these steps, your Azure Data Explorer DB source is available for visualization in the Live view.

Note
When the Azure Data Explorer DB streaming connector starts, it captures only new table changes. Historical table data aren't streamed into Eventstream.
Related content
To learn how to add other sources to an eventstream, see the following article: Add and manage an event source in an eventstream.