Note
Access to this page requires authorization. You can try signing in or changing directories.
Access to this page requires authorization. You can try changing directories.
Starting from .NET 9, Native AOT supports publishing .NET class libraries that don't depend on iOS workloads for iOS-like platforms. This support enables you to create self-contained native libraries that can be consumed from iOS, Mac Catalyst, and tvOS applications.
Important
This approach does not come with the built-in Objective-C interoperability support and additional code adaptations might be required (such as marshalling reference type arguments) to achieve interoperability.
Build shared libraries
This section describes steps to create a simple .NET Class Library project with NativeAOT support and produce a native library for iOS-like platforms from it.
Download .NET 9 SDK
Create a class library project
dotnet new classlib -n "MyNativeAOTLibrary"Add the following properties into the project file
MyNativeAOTLibrary.csproj<PublishAot>true</PublishAot> <PublishAotUsingRuntimePack>true</PublishAotUsingRuntimePack>Edit the
MyNativeAOTLibrary/Class1.cssource code to expose a managed method so that it can be referenced from the native code asaotsample_add. For example:using System.Runtime.InteropServices; namespace NaotLib; public class Class1 { [UnmanagedCallersOnly(EntryPoint = "aotsample_add")] public static int Add(int a, int b) { return a + b; } }Publish the class library and target the desired iOS-like platform by specifying the appropriate runtime identifier (referenced below as
<rid>):dotnet publish -r <rid> MyNativeAOTLibrary/MyNativeAOTLibrary.csproj
Successful completion of the previous step produces a pair of files: a shared library MyNativeAOTLibrary.dylib and its debug symbols MyNativeAOTLibrary.dylib.dSYM, which are located at: MyNativeAOTLibrary/bin/Release/net9.0/<rid>/publish/.
Note
For creating universal frameworks, it is required to publish the class library for both Arm64 and x64 architectures for a given platform.
This means that you need to repeat step 5 with a different runtime identifier.
For example, you'd publish the class library with both maccatalyst-arm64 and maccatalyst-x64 runtime identifiers as a prerequisite for Packaging the shared library into a custom MacCatalyst universal framework.
Create and consume a custom framework
Apple imposes a requirement that shared libraries (.dylibs) need to be packaged into frameworks in order to be consumed from applications.
This section describes all required steps to achieve this and a simple scenario of a iOS/MacCatalyst application consuming a shared NativeAOT library/framework.
Note
The described steps are just for demonstration purposes. The actual requirements might differ depending on the exact use case.
Package the shared library into custom iOS framework
Create a framework folder:
mkdir MyNativeAOTLibrary.frameworkAdjust load commands:
LC_RPATHload commandinstall_name_tool -rpath @executable_path @executable_path/Frameworks MyNativeAOTLibrary/bin/Release/net9.0/ios-arm64/publish/MyNativeAOTLibrary.dylibLC_ID_DYLIBload commandinstall_name_tool -id @rpath/MyNativeAOTLibrary.framework/MyNativeAOTLibrary MyNativeAOTLibrary/bin/Release/net9.0/ios-arm64/publish/MyNativeAOTLibrary.dylib
Manually package the binary into a universal file:
lipo -create MyNativeAOTLibrary/bin/Release/net9.0/ios-arm64/publish/MyNativeAOTLibrary.dylib -output MyNativeAOTLibrary.framework/MyNativeAOTLibraryAdd a property list file to your framework:
- Create a
Info.plistfile
touch MyNativeAOTLibrary.framework/Info.plist- Add the contents from the appendix into the created
Info.plistfile
- Create a
After the final step, the framework structure should look like this:
MyNativeAOTLibrary.framework
    |_ MyNativeAOTLibrary
    |_ Info.plist
Package the shared library into a custom MacCatalyst universal framework
Universal frameworks require binaries for both Arm64 and x64 architecture.
For this reason, you must publish native libraries targeting both of the following RIDs beforehand: maccatalyst-arm64 and maccatalyst-x64.
Create a framework folder structure:
mkdir -p MyNativeAOTLibrary.framework/Versions/A/Resources
ln -sfh Versions/Current/MyNativeAOTLibrary MyNativeAOTLibrary.framework/MyNativeAOTLibrary
ln -sfh Versions/Current/Resources MyNativeAOTLibrary.framework/Resources
ln -sfh A MyNativeAOTLibrary.framework/Versions/Current
Adjust load commands:
LC_RPATHload commandinstall_name_tool -rpath @executable_path @executable_path/../Frameworks MyNativeAOTLibrary/bin/Release/net9.0/maccatalyst-arm64/publish/MyNativeAOTLibrary.dylib install_name_tool -rpath @executable_path @executable_path/../Frameworks MyNativeAOTLibrary/bin/Release/net9.0/maccatalyst-x64/publish/MyNativeAOTLibrary.dylibLC_ID_DYLIBload commandinstall_name_tool -id @rpath/MyNativeAOTLibrary.framework/Versions/A/MyNativeAOTLibrary MyNativeAOTLibrary/bin/Release/net9.0/maccatalyst-arm64/publish/MyNativeAOTLibrary.dylib install_name_tool -id @rpath/MyNativeAOTLibrary.framework/Versions/A/MyNativeAOTLibrary MyNativeAOTLibrary/bin/Release/net9.0/maccatalyst-x64/publish/MyNativeAOTLibrary.dylib
Manually package the binary into a universal file:
lipo -create MyNativeAOTLibrary/bin/Release/net9.0/maccatalyst-arm64/publish/MyNativeAOTLibrary.dylib MyNativeAOTLibrary/bin/Release/net9.0/maccatalyst-x64/publish/MyNativeAOTLibrary.dylib -output MyNativeAOTLibrary.framework/Versions/A/MyNativeAOTLibraryAdd a property list file to your framework:
- Create a
Info.plistfile
touch MyNativeAOTLibrary.framework/Versions/A/Resources/Info.plist- Add the contents from the appendix into the created
Info.plistfile
- Create a
After the final step, the framework structure should look like this:
MyNativeAOTLibrary.framework
    |_ MyNativeAOTLibrary -> Versions/Current/MyNativeAOTLibrary
    |_ Resources -> Versions/Current/Resources
    |_ Versions
        |_ A
        |   |_ Resources
        |   |   |_ Info.plist
        |   |_ MyNativeAOTLibrary
        |_ Current -> A
Consume custom frameworks
Open
Xcode(in this exampleXcode 16.0is used)Create a new
AppprojectChoose the name for your app (for example,
MyiOSApp) and choose Objective-C as the source languageAdd a reference to the
MyNativeAOTLibraryframework- In the
MyiOSApptargets General tab, under Frameworks, Libraries and Embedded Content, select + to addMyNativeAOTLibraryas the referenced framework - In the dialog, choose Add Other -> Add Files and then browse to the location of
MyNativeAOTLibrary.frameworkand select it - Once selected, set
Embed and Signoption forMyNativeAOTLibraryframework
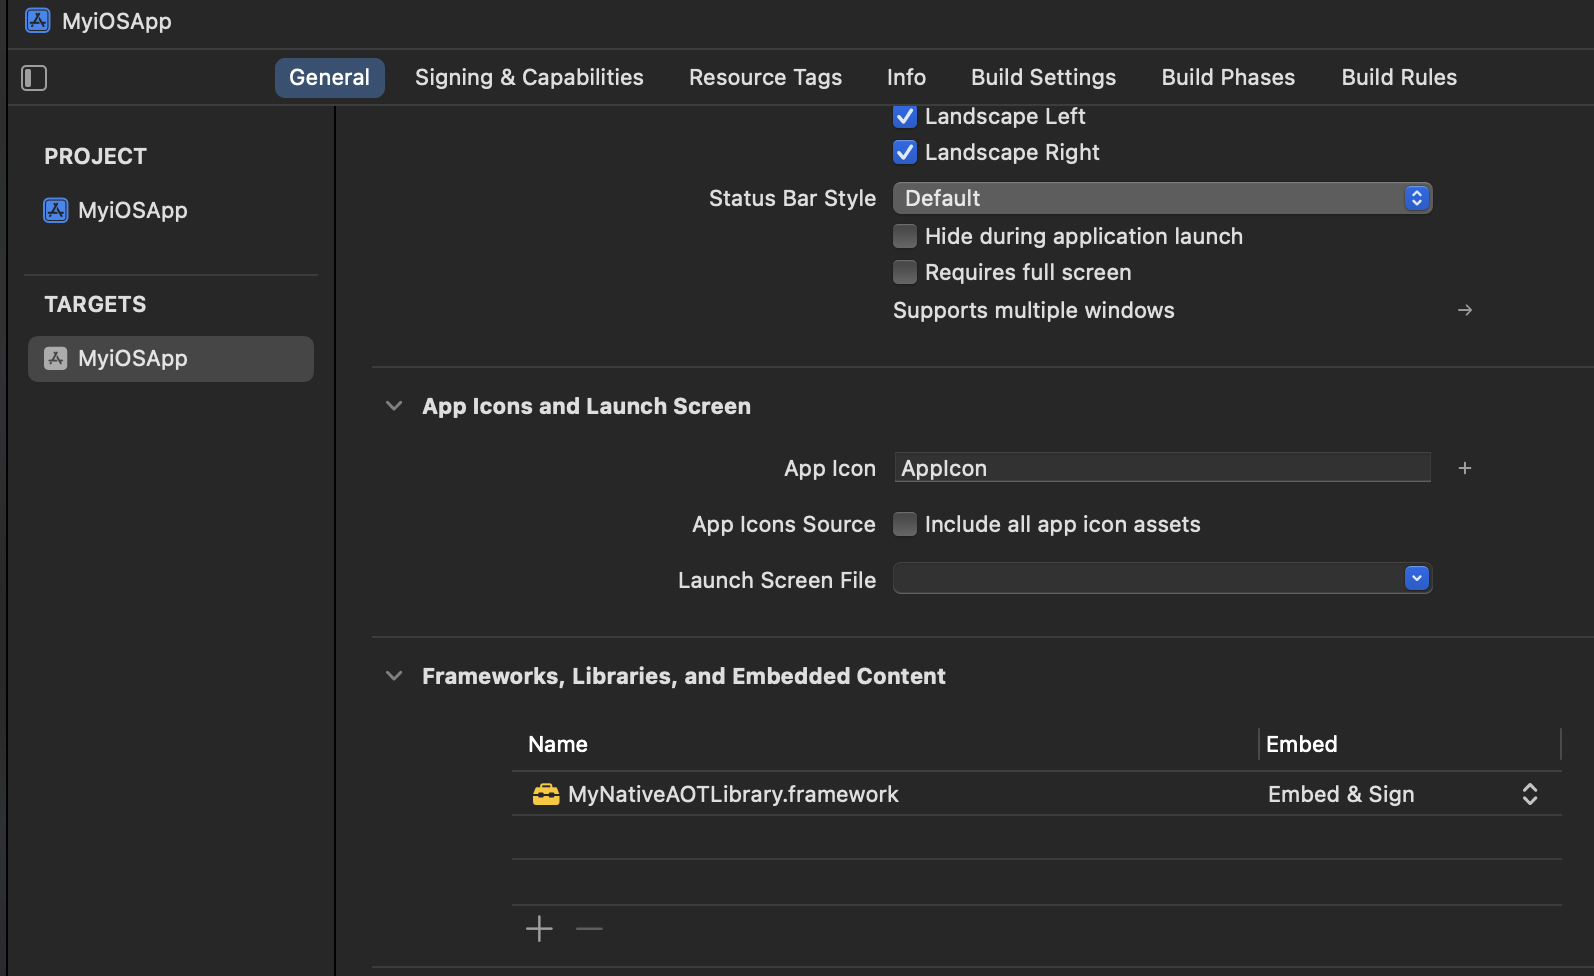
- In the
Add
MyNativeAOTLibrary.frameworklocation to the list of Framework Search Paths in the Build Settings tab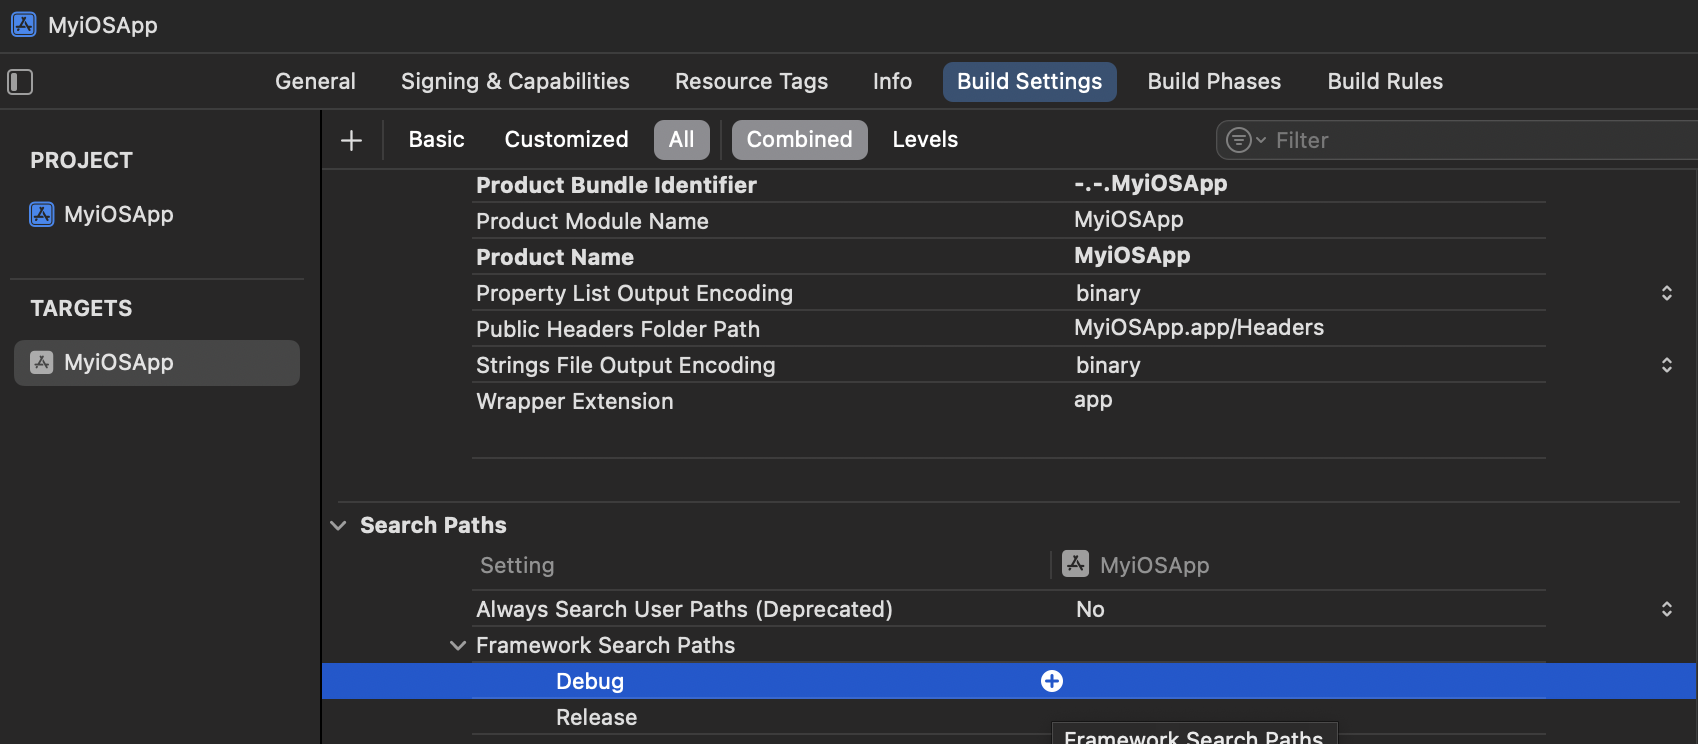
Edit
main.mby calling the exposed managed methodaotsample_addand printing the resultextern int aotsample_add(int a, int b); int main(int argc, char * argv[]) { ... NSLog(@"2 + 5 = %d", aotsample_add(2, 5)); ... }Select your physical iOS device and build/run the app
Inspect the logs after the app has successfully launched. The app should print out:
2 + 5 = 7
Note
For MacCatalyst, use the same steps except for step 7, where the Run Destination needs to be set as: Mac (Mac Catalyst).
Build static libraries with NativeAOT for iOS-like platforms
As described in building native libraries overview, it's better to build shared libraries over static ones due to several limitations.
However, if desired, you can build a static library by following the steps for building a shared one and including an additional property in the project file:
<NativeLib>Static</NativeLib>
After the project has been published, the static library MyNativeAOTLibrary.a can be found at: MyNativeAOTLibrary/bin/Release/net9.0/<rid>/publish.
This article doesn't cover how to consume the static library and configure the consumer project.
Appendix Info.plist contents
<?xml version="1.0" encoding="UTF-8"?>
<!DOCTYPE plist PUBLIC "-//Apple//DTD PLIST 1.0//EN" "http://www.apple.com/DTDs/PropertyList-1.0.dtd">
<plist version="1.0">
<dict>
    <key>CFBundleName</key>
    <string>MyNativeAOTLibrary</string>
    <key>CFBundleIdentifier</key>
    <string>com.companyname.MyNativeAOTLibrary</string>
    <key>CFBundleVersion</key>
    <string>1.0</string>
    <key>CFBundleExecutable</key>
    <string>MyNativeAOTLibrary</string>
    <key>CFBundlePackageType</key>
    <string>FMWK</string>
</dict>
</plist>
Collaborate with us on GitHub
The source for this content can be found on GitHub, where you can also create and review issues and pull requests. For more information, see our contributor guide.