Note
Access to this page requires authorization. You can try signing in or changing directories.
Access to this page requires authorization. You can try changing directories.
This article shows how to authenticate with Azure Event Grid namespace using OAuth 2.0 JSON Web Tokens.
Azure Event Grid's MQTT broker supports OAuth 2.0 JWT authentication, which enables clients to connect and authenticate with an Event Grid namespace using JSON Web Tokens that are issued by any identity provider, aside from Microsoft Entra ID.
Prerequisites
To use OAuth 2.0 JWT authentication for namespaces, you need to have the following prerequisites:
- Identity provider that can issue JSON Web Tokens.
- CA certificate that includes your public keys used to validate the client tokens(Key Vault) or PEM file of your public key certificates(direct upload).
High-level steps
To use OAuth 2.0 JWT authentication for namespaces, follow these steps:
- Create a namespace and configure its subresources.
- Enable managed identity on your Event Grid namespace.
- Configure OAuth 2.0 authentication settings on your Event Grid namespace by following these steps:
- Create an Azure Key Vault account that hosts the CA certificate that includes your public keys and add role assignment in Key Vault for the namespace’s managed identity.
- Upload the PEM file of your public key certificates to namespace.
- Your clients can connect to the Event Grid namespace using the tokens provided by your identity provider.
Create a namespace and configure its subresources
Follow instructions from Quickstart: Publish and subscribe to MQTT messages on Event Grid Namespace with Azure portal to create a namespace and configure its subresources. Skip the certificate and client creation steps as the client identities come from the provided token. Client attributes are based on the custom claims in the client token. The client attributes are used in the client group query, topic template variables, and routing enrichment configuration.
Enable managed identity on your Event Grid namespace
The namespace uses the managed identity to access your Azure Key Vault instance to get the server certificate for your custom domain. Use the following command to enable system-assigned managed identity on your Event Grid namespace:
az eventgrid namespace update --resource-group <resource group name> --name <namespace name> --identity "{type:systemassigned}"
For information configuring system and user-assigned identities using the Azure portal, see Enable managed identity for an Event Grid namespace.
Configure OAuth 2.0 JWT authentication settings on your Event Grid namespace -Key Vault
First, create an Azure Key Vault account, upload your server certificate, and assign the namespace's managed identity an appropriate role on the key vault. Then, you configure custom authentication settings on your Event Grid namespace using Azure portal and Azure CLI. You need to create the namespace first then update it using the following steps.
Create an Azure Key Vault account and upload your server certificate
Use the following command to create an Azure Key Vault account:
az keyvault create --name "<your-unique-keyvault-name>" --resource-group "<resource group name>" --location "centraluseuap"Use the following command to import a certificate to the Azure Key Vault
az keyvault certificate import --vault-name "<your-key-vault-name>" -n "<cert name>" -f "<path to your certificate pem file> "Note
Your certificate must include the domain name in the Subject Alternative name for DNS. For more information, see Tutorial: Import a certificate in Azure Key Vault.
Add role assignment in Azure Key Vault for the namespace’s managed identity
You need to provide access to the namespace to access your Azure Key Vault account using the following steps:
Get Event Grid namespace system managed identity principal ID using the following command
$principalId=(az eventgrid namespace show --resource-group <resource group name> --name <namespace name> --query identity.principalId -o tsv)Get your Azure Key vault resource ID.
$keyVaultResourceId=(az keyvault show --resource-group <resource group name> --name <your key vault name> --query id -o tsv)Add role assignment in Key Vault for the namespace’s managed identity.
az role assignment create --role "Key Vault Certificate User" --assignee $principalId --scope $keyVaultResourceIdFor more information about Key Vault access and the portal experience, see Provide access to Key Vault keys, certificates, and secrets with an Azure role-based access control.
Use Azure portal to configure authentication
Navigate to your Event Grid namespace in the Azure portal.
On the Event Grid Namespace page, select Configuration on the left menu.
In the Custom JWT authentication section, specify values for the following properties:
Select Enable custom JWT authentication.
Token Issuer: Enter the value of the issuer claims of the JWTs, presented by the MQTT clients.
For Issuer certificate, select From Azure Key Vault.
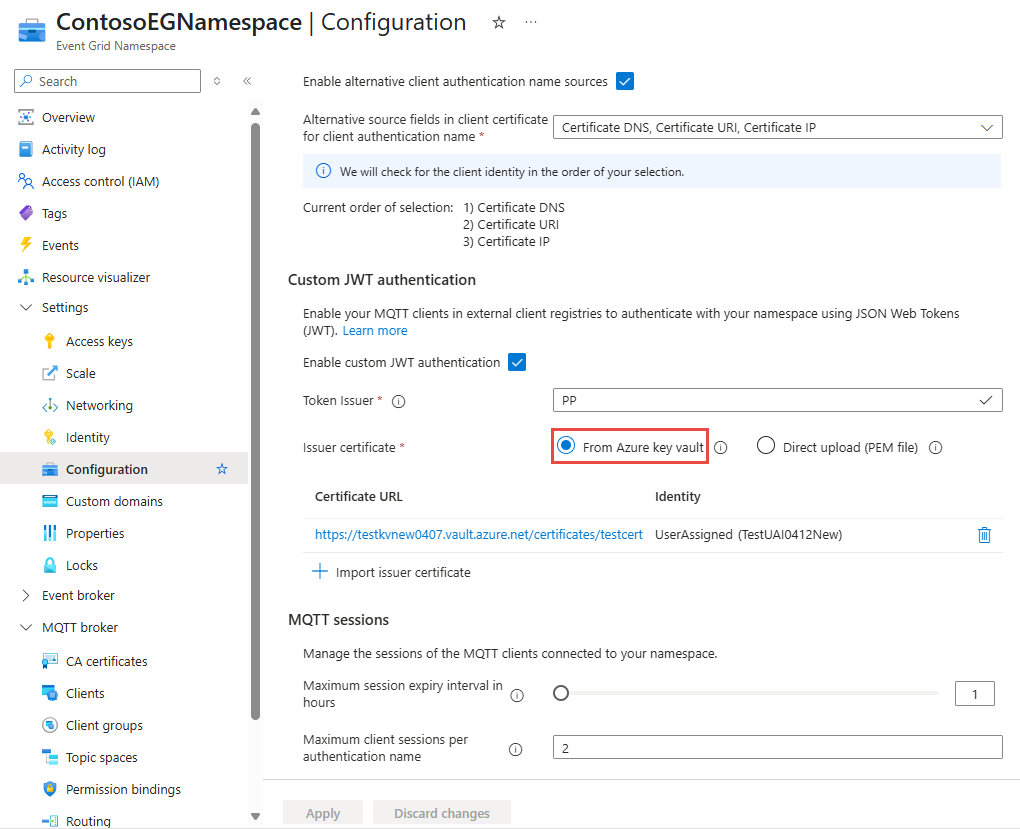
In the new page, specify values for the following properties.
Certificate URL: the Certificate Identifier of the issuer certificate in Azure Key Vault that you created. You can choose Select a certificate using a key vault instead to select the certificate and the key vault from your subscriptions.
Identity: the identity used to authenticate with the Key Vault to access the issuer certificate that was created.
Select Add.

Back on the Configuration page, select Apply.
Note
You can add up to two
isscertificates for certificate/key rotation purposes.

Use Azure CLI
Use the following command to update your namespace with the custom JWT authentication configuration.
az resource update \
  --resource-type Microsoft.EventGrid/namespaces \
  --api-version 2024-06-01-preview \
  --ids /subscriptions/1111a1a1-bb2b-cc3c-dd4d-ffffee5e5e5e/resourceGroups/sample-rg/providers/Microsoft.EventGrid/namespaces/sample-namespace \
  --set properties.topicSpacesConfiguration.clientAuthentication='{
    \"customJwtAuthentication\":{
      \"tokenIssuer\":\"sample-issuer\",
      \"issuerCertificates\":[
        {
          \"certificateUrl\":\"https://sample-vault.vault.azure.net/certificates/sample-cert/12345abcdef67890\",
          \"identity\":{
            \"type\":\"UserAssigned\",
            \"userAssignedIdentity\":\"/subscriptions/1111a1a1-bb2b-cc3c-dd4d-ffffee5e5e5e/resourceGroups/sample-rg/providers/Microsoft.ManagedIdentity/userAssignedIdentities/sample-identity\"
          }
        }
      ]
    }
  }'
JSON Web Token format
JSON Web Tokens are divided into the JWT Header and JWT payload sections.
JWT Header
The header must contain at least typ and alg fields. typ must always be JWS and alg must always be RS256. The token header must be as follows:
{
    "typ": "JWT",
    "alg": "RS256"
}
JWT payload
Event Grid requires the following claims: iss, sub, aud, exp, nbf.
| Name | Description |
|---|---|
iss |
Issuer. Value in JWT must match issuer in the Event Grid namespace configuration for custom JWT authentication. |
sub |
Subject. Value is used as authentication identity name. |
aud |
Audience. Value can be a string or an array of strings. Value must contain standard Event Grid namespace hostname and/or custom domain for that Event Grid namespace (if configured). Audience can contain other strings, but we require at least one of these strings to be a standard Event Grid namespace hostname or custom domain for this namespace. |
exp |
Expiration. Unix time when JWT expires. |
nbf |
Not before. Unit time when JWT becomes valid. |
Event Grid maps all claims to client attributes if they have one of the following types: int32, string, array of strings. Standard claims iss, sub, aud, exp, nbf are excluded from client attributes. In the following JWT example, only three claims are converted to client attributes, num_attr, str_attr, str_list_attr, because they have correct types int32, string, array of strings. incorrect_attr_1, incorrect_attr_2, incorrect_attr_3 aren't converted to client attributes, because they have wrong types: float, array of integers, object.
{
    "iss": "correct_issuer",
    "sub": "d1",
    "aud": "testns.mqtt-broker-int.azure.net",
    "exp": 1712876224,
    "nbf": 1712869024,
    "num_attr": 1,
    "str_attr": "some string",
    "str_list_attr": [
        "string 1",
        "string 2"
    ],
    "incorrect_attr_1": 1.23,
    "incorrect_attr_2": [
        1,
        2,
        3
    ],
    "incorrect_attr_3": {
        "field": "value"
    }
}
Configure OAuth 2.0 JWT authentication settings on your Event Grid namespace - Direct upload
In this step, you configure custom JWT authentication settings on your Event Grid namespace using Azure portal and Azure CLI. You need to create the namespace first then update it using the following steps.
Use Azure portal
- Navigate to your Event Grid namespace in the Azure portal.
- On the Event Grid Namespace page, select Configuration on the left menu.
- In the Custom JWT authentication section, specify values for the following properties:
Select Enable custom JWT authentication.
Token Issuer: Enter the value of the issuer claims of the JWTs, presented by the MQTT clients.
Select issuer certificate option – Direct Upload.
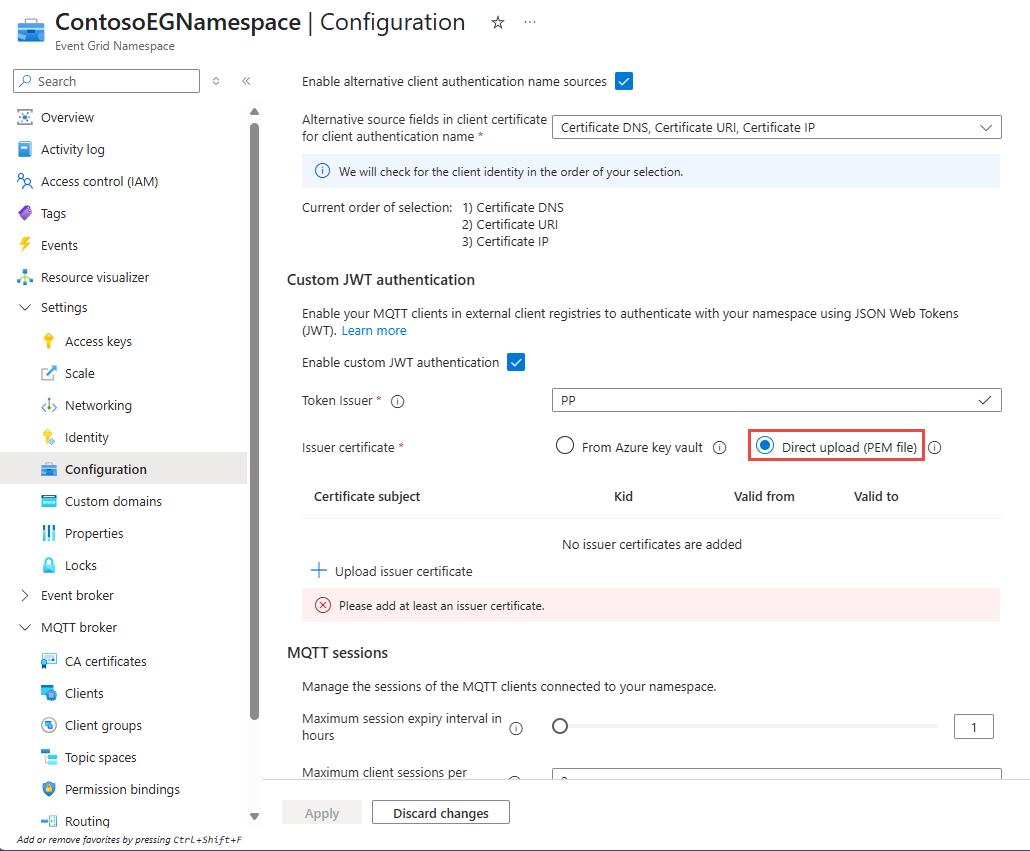
- In the new page, specify values for the following properties.
Certificate: upload your server certificate in PEM Format.
Kid: A unique key identifier for the certificate.
Select Add.

- Back on the Configuration page, select Apply.


Use Azure CLI
Use the following command to update your namespace with the OAuth 2.0 JWT authentication configuration.
az eventgrid namespace update \
    --resource-group <resource-group-name> \
    --name <namespace-name> \
    --api-version 2024-12-15-preview \
    --set customJwtAuthenticationSettings='{
        "tokenIssuer": "issuer-name",
        "encodedIssuerCertificates": [
            {
                "kid": "key1",
                "encodedCertificate": "-----BEGIN CERTIFICATE-----\n<certificate-in-PEM-format>\n-----END CERTIFICATE-----"
            }
        ]
    }
- Replace
<resource-group-name>,<namespace-name>,<location>,<key-vault-name>,<certificate-name>, and<certificate-in-PEM-format>with your actual values. - The encodedCertificate value must include the full certificate in PEM format, including headers (
"-----BEGIN CERTIFICATE-----" and "-----END CERTIFICATE----). - Ensure the public key certificate provided is valid and trusted by your identity provider.
- Regularly update the encodedIssuerCertificates if certificates are rotated or expired.
JSON Web Token format
JWT payload
Event Grid requires the following claims: iss, sub, aud, exp, nbf.
kidis optional. If it is present, then certificate with matchingkidis used for validation.- List of standard claims that aren't used as attributes -
iss,sub,aud,exp,nbf,iat,jti. - All claims which have correct data type (number that fits int32, string, array of strings) are used as attributes. In the example
num_attr_pos,num_attr_neg,str_attr,str_list_attrclaims have correct data types and are used as attributes. - In the example
bool_attr,num_attr_to_big,num_attr_float,obj_attrclaims have incorrect data types and aren't be used as attributes.
{
  "typ": "JWT",
  "alg": "RS256",
  "kid": "keyId1"
}.{
  "iss": "some-issuer",
  "sub": "device1",
  "aud": "event-grid-namespace.ts.eventgrid.azure.net",
  "exp": 1770426501,
  "nbf": 1738886901,
  "bool_attr": true,
  "num_attr_pos": 1,
  "num_attr_neg": -1,
  "num_attr_to_big": 9223372036854775807,
  "num_attr_float": 1.23,
  "str_attr": "str_value",
  "str_list_attr": [
    "str_value_1",
    "str_value_2"
  ],
  "obj_attr": {
      "key": "value"
  }
}