Note
Access to this page requires authorization. You can try signing in or changing directories.
Access to this page requires authorization. You can try changing directories.
Note
Microsoft Dev Box is at Build 2025!
Join us online or in person for our Breakout session: Unleash developer potential with AI and Dev Box
- Thursday, May 22; 8:30 AM - 9:30 AM PDT.
If you're attending Build in person, sign up for our hands-on lab Build the ultimate enterprise ready cloud development environment
- Tuesday, May 20 3:30 PM - 4:45 PM PDT
- Thursday, May 22 10:15 AM - 11:30 AM PDT
The Dev Box individual customizations feature helps you streamline the setup of your dev boxes. Starting a new project or joining a team is often complex and time consuming. With customizations, you can configure your dev boxes with the applications, tools, repositories, code libraries, packages, and build scripts that you need. This article guides you through the process of creating, testing, and editing an individual customization file for your dev box using Visual Studio Code (VS Code).
You can use customizations in Microsoft Dev Box in two ways. Team customizations are used to create a shared configuration for a team of developers. Individual customizations are used to create a personal configuration for an individual developer. The following table summarizes the differences between the two types of customizations.
| Feature | Team customizations | Individual customizations |
|---|---|---|
| Configure on | Dev box pool | Dev box |
| Customizations apply to | All dev boxes in pool | Individual dev box |
| Easily shareable | Yes | No |
| Customizations file name | Imagedefinition.yaml | myfilename.yaml or workload.yaml |
| Sourced from | Catalog | Uploaded or from personal repository |
| Supports key vault secrets | Yes | Yes |
Prerequisites
To complete the steps in this article, you must:
- Have a dev center configured with a dev box definition, dev box pool, and dev box project so that you can create a dev box.
- Be a member of the Dev Box Users security group for at least one project.
- Have a catalog attached to the dev center with tasks that you can use in your customization file. If you don't have a catalog, see Add and configure a catalog from GitHub or Azure Repos.
Permissions required to configure customizations
To perform the required actions for creating and applying customizations to a dev box, you need the following permissions:
| Action | Permission/Role |
|---|---|
| Create a customization file. | None specified. Anyone can create a customization file. |
| Use the developer portal to upload and apply a YAML file during dev box creation. | Dev Box User |
Create an individual customization file
You can create and manage customization files by using VS Code. You can use the Microsoft Dev Box extension in VS Code to discover the tasks in the attached catalog and test the customization file.
Create a dev box (or use an existing dev box) for testing.
On the test dev box, install VS Code and then install the Dev Box extension.
Download an example YAML customization file from the samples repository and open it in VS Code.
Discover tasks available in the catalog by using the command palette. Select View > Command Palette > Dev Box: List Available Tasks For This Dev Box.

Test customization in VS Code by using the command palette. Select View > Command Palette > Dev Box: Apply Customizations Tasks.

The customization file runs and applies the specified tasks to your test dev box. Inspect the changes, and check the VS Code terminal for any errors or warnings generated during the task execution. Review the VS Code terminal for errors or warnings during task execution.
When the customization file runs successfully, upload it to your catalog.
Optional: Customize your dev box by using existing WinGet Configuration files
WinGet configuration takes a config-as-code approach to defining the unique sets of software and configuration settings needed to get your Windows environment in a ready-to-code state. You can also use these configuration files to set up a dev box, by using a WinGet task included in the Microsoft-provided quickstart catalog.
This example shows a dev box customization file that uses an existing WinGet Desired State Configuration (DSC) file:
tasks:
    - name: winget
      parameters:
          configure: "projectConfiguration.dsc.yaml"
To learn more, see WinGet configuration.
Create a dev box using an individual customization file
You can use an individual customization file by uploading it from a local drive when creating your dev box, or by downloading it from a repository. Customization files stored in a repository must be called workload.yaml. Customization files that are stored locally for upload should be called myfilename.yaml. Name customization files stored locally for upload as myfilename.yaml.
Upload a file
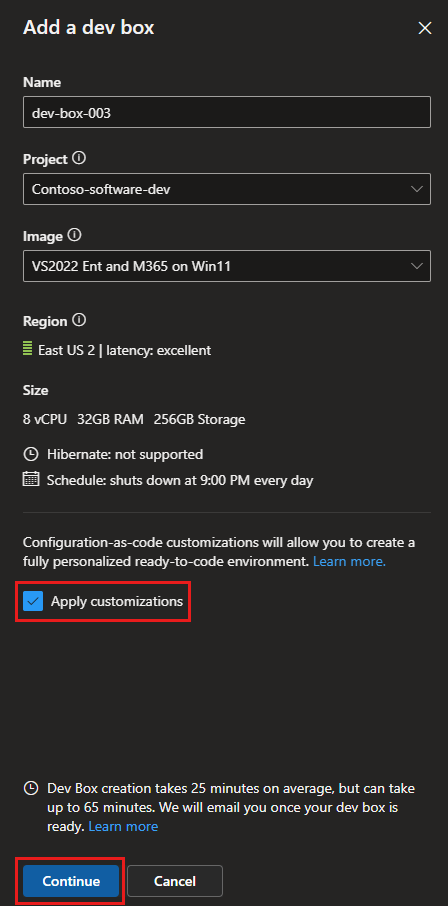
In the developer portal, select New > New dev box.
In the Add a dev box pane, add details for you dev box.
Select Apply customizations, and then select Continue.
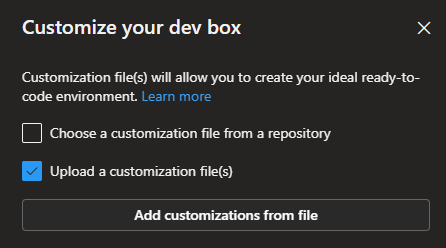
Select Upload a customization file(s), select Add customizations from file, and then browse to and select your myfilename.yaml file.
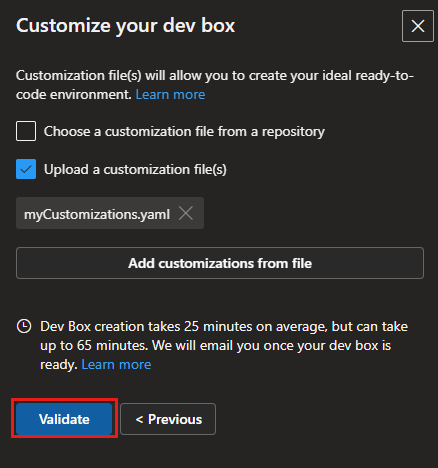
To verify that the tasks in your customizations file will be applied correctly, you must validate them before you can proceed. Select Validate.
Review the dev box creation summary, and then select Create.

Get a file from a repository
In the developer portal, select New > New dev box.
In the Add a dev box pane, add details for you dev box.
Select Apply customizations, and then select Continue.
Select Upload a customization file(s), select Choose a customization file from a repository, and then enter the URL for the repository that stores your workload.yaml file.

To verify that the tasks in your customizations file will be applied correctly, you must validate them before you can proceed. Select Validate.
Review the dev box creation summary, and then select Create.