Note
Access to this page requires authorization. You can try signing in or changing directories.
Access to this page requires authorization. You can try changing directories.
This article describes how to use the redis-cli command-line interface to interact with Azure Cache for Redis as a client. You can use redis-cli to directly interact with your Azure Redis cache instance, and for debugging and troubleshooting.
Prerequisite
Access to an Azure Cache for Redis server instance.
Install redis-cli
The redis-cli tool installs automatically with the Redis package, which is available for Linux, macOS, and Windows. For detailed installation instructions, see the open-source Redis documentation.
Install on Linux
The redis-cli tool runs natively on Linux, and most Linux distributions include a Redis package that contains redis-cli. For instance, you install the Redis package on Ubuntu with the following commands:
sudo apt-get update
sudo apt-get install redis
Install on Windows
The best way to use redis-cli on Windows is to install the Windows Subsystem for Linux (WSL), which allows you to run Linux tools directly on Windows. To install WSL, see How to install Linux on Windows with WSL.
Once installed, use WSL to install a Linux distro, and then install redis-cli by using the available package management for the Linux distro you chose. The default distro for WSL is Ubuntu. For more information, see the open-source Redis documentation.
Connect using redis-cli
To use redis-cli to connect to your Azure Redis cache as a client, you must specify the cache host name, port, and keys. You can retrieve these values by the following methods:
- Azure CLI using az redis list-keys
- Azure PowerShell using Get-AzRedisCacheKey
- Azure portal
The following section describes how to get these values from the Azure portal.
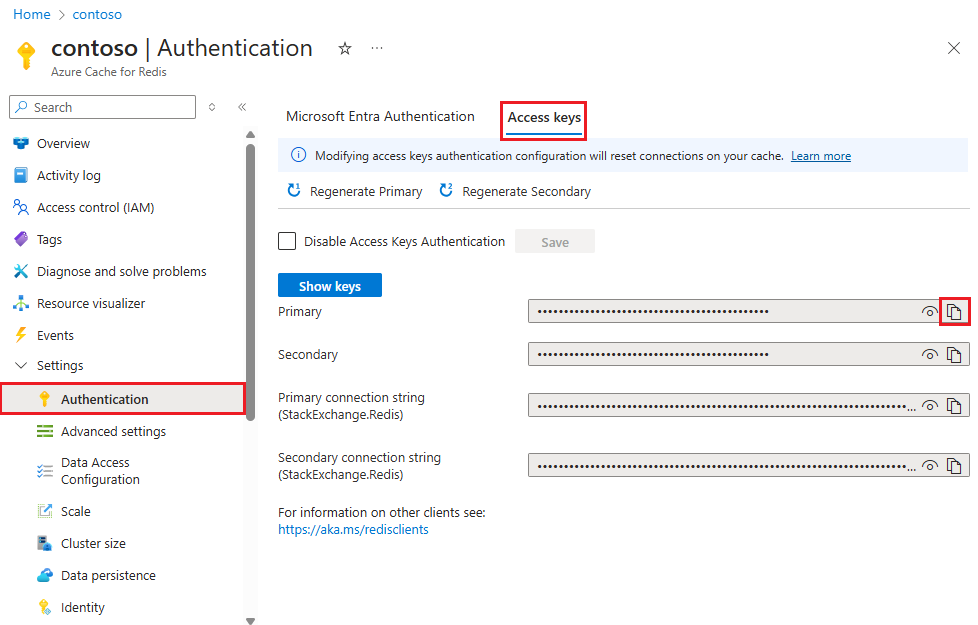
Get cache host name, port, and access keys from the Azure portal
To connect to your Azure Redis cache, the cache client needs the cache host name, ports, and keys. Some clients might refer to these items by slightly different names. Follow these instructions to get the cache host name, ports, and keys from the Azure portal.
Get the host name from the cache Overview page. The host name is of the form
<cachename>.redis.cache.windows.net.Select the link next to Ports to get the ports. Enterprise and Enterprise Flash tier caches use port
10000. Basic, Standard, and Premium tier caches use either port6380for Transport Layer Security (TLS) connections or port6379for non-TLS connections.To get the access keys, select Show access keys.

The CacheKeys pane displays the keys.
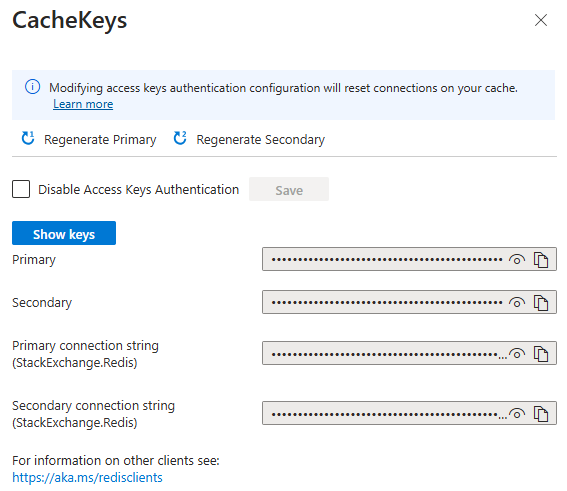
You can also select Authentication under Settings in the left navigation menu, and then select the Access keys tab.
Get other cache information
You might also need to specify the following options for redis-cli:
- TLS: By default, Azure Redis instances use TLS encryption for connections. If the cache uses TLS, you must enable TLS for redis-cli by using the
--tlsoption. - Clustering: If you have a Premium tier cache that uses clustering, or an Enterprise or Enterprise Flash tier cache that uses OSS cluster policy, add the
-coption to ensure that all shards can be accessed.
Run the redis-cli connection command
To connect to your cache, open a shell or terminal on a computer with the Redis package installed. On Windows, you can use WSL with Windows Terminal to open a Linux command line.
Run one of the following command lines, depending on your TLS, port, and clustering options. Replace the <cache name> and <access key> placeholders with the values for your cache.
Connect to a Basic, Standard, or Premium tier Azure Redis instance that uses TLS:
redis-cli -p 6380 -h <cache name>.redis.cache.windows.net -a <access key> --tlsConnect to a Basic, Standard, or Premium tier Azure Redis instance that doesn't use TLS:
redis-cli -p 6379 -h <cache name>.redis.cache.windows.net -a <access key>Connect to a Premium tier Azure Redis instance that uses TLS and clustering:
redis-cli -p 6380 -h <cache name>.redis.cache.windows.net -a <access key> --tls -cConnect to an Enterprise or Enterprise Flash tier cache instance that uses Enterprise cluster policy with TLS:
redis-cli -p 10000 -h <cache name>.eastus.redisenterprise.cache.azure.net -a <access key> --tlsConnect to an Enterprise or Enterprise Flash tier cache instance that uses OSS cluster policy without TLS:
redis-cli -p 10000 -h <cache name>.eastus.redisenterprise.cache.azure.net -a <access key> -c
You're now connected to your Azure Redis cache instance.
Use redis-cli commands with your Azure Redis cache
Once you establish the connection, you can issue commands to your Azure Redis instance at the redis-cli command prompt. The following examples show a connection to a cache named contoso that uses port 6380.
One easy way to test the connection is to use the PING command. The command returns PONG in the console.
contoso.redis.cache.windows.net:6380> PING
PONG
You can also run commands like SET and GET.
contoso.redis.cache.windows.net:6380> SET hello world
OK
contoso.redis.cache.windows.net:6380> GET hello
"world"
Alternatives to redis-cli
While the redis-cli is a useful tool, you can also use the following other methods to connect to your cache for troubleshooting or testing:
- Redis Console lets you issue commands without having to install redis-cli. Redis Console is currently available only for Basic, Standard, and Premium tiers. If Redis Console is available, you can use it by selecting Console in the top toolbar of your cache Overview page in the Azure portal.
- RedisInsight is a rich open-source graphical tool for issuing Redis commands and viewing the contents of a Redis instance. RedisInsight works with Azure Cache for Redis and is supported on Linux, Windows, and macOS.
Related content
Get started by creating a new Enterprise-tier cache.