Note
Access to this page requires authorization. You can try signing in or changing directories.
Access to this page requires authorization. You can try changing directories.
Note
For ASP.NET in .NET Framework, see Configure an ASP.NET app for Azure App Service. If your ASP.NET Core app runs in a custom Windows or Linux container, see Configure a custom container for Azure App Service.
ASP.NET Core apps must be deployed to Azure App Service as compiled binaries. The Visual Studio publishing tool builds the solution and then deploys the compiled binaries directly. The App Service deployment engine deploys the code repository first and then compiles the binaries.
This guide provides key concepts and instructions for ASP.NET Core developers. If this is your first time using Azure App Service, first follow the ASP.NET Core quickstart and ASP.NET Core with SQL Database tutorial.
Show supported .NET Core runtime versions
In App Service, the Windows instances already have all the supported .NET Core versions installed. To see the .NET Core runtime and SDK versions that are available to you, go to https://<app-name>.scm.azurewebsites.net/DebugConsole and run the following command in the browser-based console:
dotnet --info
Show .NET Core version
To show the current .NET Core version, run the following command in Azure Cloud Shell:
az webapp config show --resource-group <resource-group-name> --name <app-name> --query linuxFxVersion
To show all supported .NET Core versions, run the following command in Cloud Shell:
az webapp list-runtimes --os linux | grep DOTNET
Set .NET Core version
Set the target framework in the project file for your ASP.NET Core project. For more information, see Select the .NET Core version to use.
To set the .NET Core version to 8.0, run the following command in Cloud Shell:
az webapp config set --name <app-name> --resource-group <resource-group-name> --linux-fx-version "DOTNETCORE|8.0"
What happens to outdated runtimes in App Service?
Outdated runtimes are deprecated by the maintaining organization or found to have significant vulnerabilities. Accordingly, they're removed from the create and configure pages in the portal. When an outdated runtime is hidden from the portal, any app that's still using that runtime continues to run.
If you want to create an app with an outdated runtime version that's no longer shown on the portal, use the Azure CLI, ARM template, or Bicep. These deployment alternatives let you create deprecated runtimes that have been removed in the portal, but are still being supported.
If a runtime is fully removed from the App Service platform, your Azure subscription owner receives an email notice before the removal.
Customize build automation
If you deploy your app by using Git or ZIP packages with build automation enabled, the App Service build automation follows this sequence:
- Run custom script if specified by
PRE_BUILD_SCRIPT_PATH. - To restore NuGet dependencies, run
dotnet restore. - To build a binary for production, run
dotnet publish. - Run custom script if specified by
POST_BUILD_SCRIPT_PATH.
PRE_BUILD_COMMAND and POST_BUILD_COMMAND are environment variables that are empty by default. To run prebuild commands, define PRE_BUILD_COMMAND. To run post-build commands, define POST_BUILD_COMMAND.
The following example specifies the two variables to a series of commands, separated by commas.
az webapp config appsettings set --name <app-name> --resource-group <resource-group-name> --settings PRE_BUILD_COMMAND="echo foo, scripts/prebuild.sh"
az webapp config appsettings set --name <app-name> --resource-group <resource-group-name> --settings POST_BUILD_COMMAND="echo foo, scripts/postbuild.sh"
For other environment variables that you can use to customize build automation, see Oryx configuration.
For more information on how App Service runs and builds ASP.NET Core apps in Linux, see Oryx documentation: How .NET Core apps are detected and built.
Access environment variables
In App Service, you can set app settings outside your app code. You can then access them in any class by using the standard ASP.NET Core dependency injection pattern:
using Microsoft.Extensions.Configuration;

namespace SomeNamespace
{
    public class SomeClass
    {
        private IConfiguration _configuration;

        public SomeClass(IConfiguration configuration)
        {
            _configuration = configuration;
        }

        public SomeMethod()
        {
            // retrieve nested App Service app setting
            var myHierarchicalConfig = _configuration["My:Hierarchical:Config:Data"];
            // retrieve App Service connection string
            var myConnString = _configuration.GetConnectionString("MyDbConnection");
        }
    }
}
If you configure an app setting with the same name in App Service and in appsettings.json, for example, the App Service value takes precedence over the appsettings.json value. By using the local appsettings.json value, you can debug the app locally, but by using the App Service value, you can run the app in production with production settings. Connection strings work the same way. By using this method, you can keep your application secrets outside your code repository and access the appropriate values without changing your code.
Note
You can also consider more secure connectivity options that don't require connection secrets. For more information, see Secure connectivity to Azure services and databases from Azure App Service.
The hierarchical configuration data in appsettings.json is accessed by using the __ (double underscore) delimiter that's standard on Linux to .NET Core. To override a specific hierarchical configuration setting in App Service, set the app setting name with the same delimited format in the key. You can run the following example in Cloud Shell:
az webapp config appsettings set --name <app-name> --resource-group <resource-group-name> --settings My__Hierarchical__Config__Data="some value"
The hierarchical configuration data in appsettings.json is accessed by using the : delimiter that's standard to .NET Core. To override a specific hierarchical configuration setting in App Service, set the app setting name with the same delimited format in the key. You can run the following example in Azure Cloud Shell:
az webapp config appsettings set --name <app-name> --resource-group <resource-group-name> --settings My:Hierarchical:Config:Data="some value"
Deploy multi-project solutions
When a Visual Studio solution includes multiple projects, the Visual Studio publish process automatically selects the project to deploy. When you deploy to the App Service deployment engine, such as with Git, or with ZIP deploy with build automation enabled, the App Service deployment engine picks the first website or web application project that it finds as the App Service app. You can specify which project App Service should use by specifying the PROJECT app setting. For example, run the following command in Cloud Shell:
az webapp config appsettings set --resource-group <resource-group-name> --name <app-name> --settings PROJECT="<project-name>/<project-name>.csproj"
Access diagnostic logs
ASP.NET Core offers a built-in logging provider for App Service. In your project's program.cs file, add the provider to your application through the ConfigureLogging extension method, as shown in the following example:
public static IHostBuilder CreateHostBuilder(string[] args) =>
    Host.CreateDefaultBuilder(args)
        .ConfigureLogging(logging =>
        {
            logging.AddAzureWebAppDiagnostics();
        })
        .ConfigureWebHostDefaults(webBuilder =>
        {
            webBuilder.UseStartup<Startup>();
        });
You can then configure and generate logs with the standard .NET Core pattern.
To access the console logs generated from inside your application code in App Service, turn on diagnostic logging by running the following command in Cloud Shell:
az webapp log config --resource-group <resource-group-name> --name <app-name> --docker-container-logging filesystem --level Verbose
Possible values for --level are Error, Warning, Info, and Verbose. Each subsequent level includes the previous level. For example, Error includes only error messages. Verbose includes all messages.
After you turn on diagnostic logging, run the following command to see the log stream:
az webapp log tail --resource-group <resource-group-name> --name <app-name>
If console logs don't appear immediately, check again in 30 seconds.
Note
You can also inspect the log files from the browser at https://<app-name>.scm.azurewebsites.net/api/logs/docker. For recently created apps, use https://<app-name>-<random-hash>.scm.<region>.azurewebsites.net/.
To stop log streaming at any time, select Ctrl+C.
For more information on troubleshooting ASP.NET Core apps in App Service, see Troubleshoot ASP.NET Core on Azure App Service and IIS.
Access a detailed exceptions page
When your ASP.NET Core app generates an exception in the Visual Studio debugger, the browser displays a detailed exception page, but in App Service that page is replaced by a generic "HTTP 500" or "An error occurred while processing your request." To display the detailed exception page in App Service, add the ASPNETCORE_ENVIRONMENT app setting to your app by running the following command in Cloud Shell.
az webapp config appsettings set --name <app-name> --resource-group <resource-group-name> --settings ASPNETCORE_ENVIRONMENT="Development"
Detect HTTPS session
In App Service, TLS/SSL termination happens at the network load balancers, so all HTTPS requests reach your app as unencrypted HTTP requests. If your app logic needs to know if user requests are encrypted, configure the Forwarded Headers Middleware in Startup.cs:
- Configure the middleware with
ForwardedHeadersOptionsto forward theX-Forwarded-ForandX-Forwarded-Protoheaders inStartup.ConfigureServices. - Add private IP address ranges to the known networks, so that the middleware can trust the App Service load balancer.
- Invoke the
UseForwardedHeadersmethod inStartup.Configurebefore calling other middleware.
When you assemble the three elements, your code looks like the following example:
public void ConfigureServices(IServiceCollection services)
{
    services.AddMvc();

    services.Configure<ForwardedHeadersOptions>(options =>
    {
        options.ForwardedHeaders =
            ForwardedHeaders.XForwardedFor | ForwardedHeaders.XForwardedProto;
        // These three subnets encapsulate the applicable Azure subnets. At the moment, it's not possible to narrow it down further.
        options.KnownNetworks.Add(new IPNetwork(IPAddress.Parse("::ffff:10.0.0.0"), 104));
        options.KnownNetworks.Add(new IPNetwork(IPAddress.Parse("::ffff:192.168.0.0"), 112));
        options.KnownNetworks.Add(new IPNetwork(IPAddress.Parse("::ffff:172.16.0.0"), 108));
    });
}

public void Configure(IApplicationBuilder app, IHostingEnvironment env)
{
    app.UseForwardedHeaders();

    ...

    app.UseMvc();
}
For more information, see Configure ASP.NET Core to work with proxy servers and load balancers.
Rewrite or redirect URL
To rewrite or redirect a URL, use the URL-rewriting middleware in ASP.NET Core.
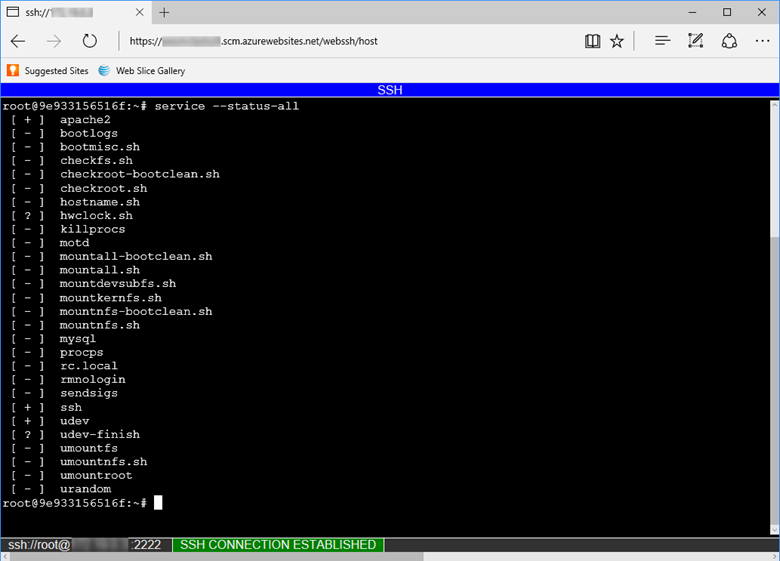
Open SSH session in browser
To open a direct SSH session with your container, your app should be running.
Paste the following URL into your browser and replace <app-name> with your app name:
https://<app-name>.scm.azurewebsites.net/webssh/host
If you're not yet authenticated, you're required to authenticate with your Azure subscription to connect. Once authenticated, you see an in-browser shell, where you can run commands inside your container.
Note
Any changes that you make outside the /home directory are stored in the container itself and don't persist beyond an app restart.
To open a remote SSH session from your local machine, see Open SSH session from remote shell.
Ignore the robots933456 message in logs
You might see the following message in the container logs:
2019-04-08T14:07:56.641002476Z "-" - - [08/Apr/2019:14:07:56 +0000] "GET /robots933456.txt HTTP/1.1" 404 415 "-" "-"
You can safely ignore this message. /robots933456.txt is a dummy URL path that App Service uses to check if the container is capable of serving requests. A 404 response indicates that the path doesn't exist, and it signals to App Service that the container is healthy and ready to respond to requests.