How to reattach an OS Disk after detaching from a VM?

Jugert Mucoimaj 0 Reputation points
2025-05-07T08:22:22.09+00:00

I wanted to detach an OS Disk from an existing VM and the only way I found that this can be done is by deleting the VM but keeping the OS Disk. See picture below.

User's image

Which is fine by me but when creating a new VM how do I attach this disk to the new VM?

Azure Virtual Machines
An Azure service that is used to provision Windows and Linux virtual machines.
8,763 questions
0 comments No comments
{count} votes

3 answers

Sort by: Most helpful
  1. Andreas Baumgarten 120.7K Reputation points MVP
    2025-05-07T09:01:27.5233333+00:00

    Hi @Jugert Mucoimaj ,

    in the Azure Portal navigate to the unattached disk (Search for Disks and navigate/open the unattached disk in the list).

    In the top menu of the disk detail blade click on + Create VM and follow the wizard.

    User's image


    (If the reply was helpful please don't forget to upvote and/or accept as answer, thank you)

    Regards

    Andreas Baumgarten

    0 comments No comments

  2. Abiola Akinbade 27,215 Reputation points
    2025-05-07T09:06:11.12+00:00

    Hello Jugert Mucoimaj

    To do that you need to follow these steps on the new VM:

    1. Go to the Azure portal and select Create a resource > Virtual Machine
    2. In the Disks section of the VM creation, select "Use an existing disk" for the OS disk
    3. Browse to select your OS disk from the list of available disks
    4. Complete the rest of the VM configuration

    See: https://learn.microsoft.com/en-us/azure/virtual-machines/windows/detach-disk

    You can mark it 'Accept Answer' and 'Upvote' if this helped you

    Regards,

    Abiola

    0 comments No comments

  3. Durga Reshma Malthi 110 Reputation points Microsoft External Staff
    2025-05-07T09:20:19.29+00:00

    Hi Jugert Mucoimaj

    As shown in your picture, after deleting the VM, go to the Azure portal -> Disks.

    Select the disk that has been retained and ensure it is not attached to any VM.

    Next, Go to Azure portal -> Virtual Machines -> Click create. In the Disks tab of the VM creation wizard, select Use an existing disk, then choose the retained OS disk. Proceed to create the VM with the necessary details.
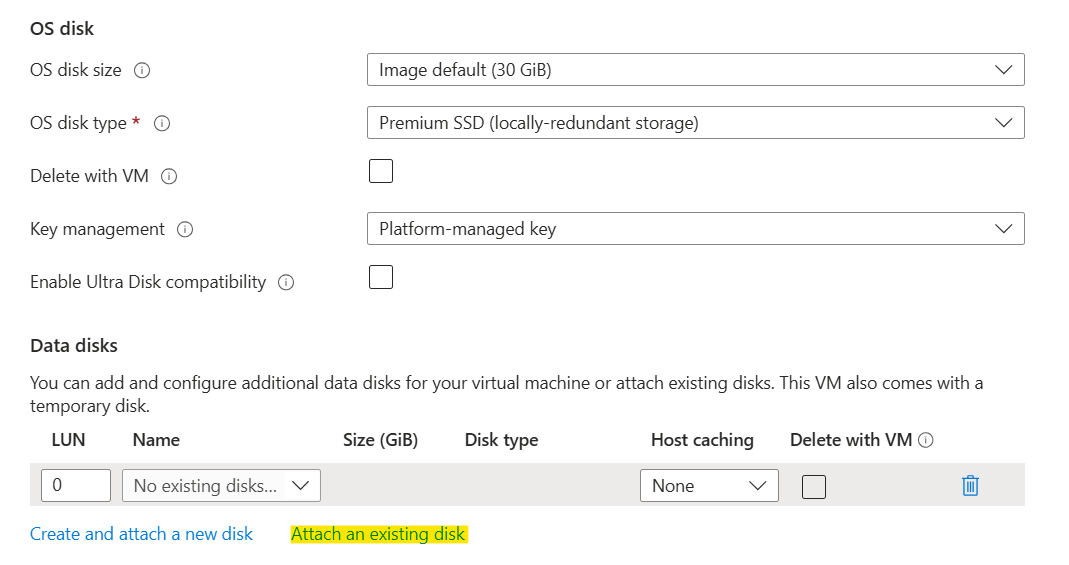
    User's image

    Additional References:

    https://learn.microsoft.com/en-us/azure/virtual-machines/attach-os-disk?tabs=portal

    https://learn.microsoft.com/en-us/azure/virtual-machines/windows/attach-managed-disk-portal

    Hope this helps!

    Please Let me know if you have any queries.

    If you found the information helpful, please click "Upvote" on the post to let us know and please consider accepting an answer as a token of appreciation. Thank You.


Your answer

Answers can be marked as Accepted Answers by the question author, which helps users to know the answer solved the author's problem.