Note
Access to this page requires authorization. You can try signing in or changing directories.
Access to this page requires authorization. You can try changing directories.
Note
Microsoft Dev Box is at Build 2025!
Join us online or in person for our Breakout session: Unleash developer potential with AI and Dev Box Register online for free!
- Thursday, May 22; 8:30 AM - 9:30 AM PDT.
If you're attending Build in person, sign up for our hands-on lab Build the ultimate enterprise ready cloud development environment
- Tuesday, May 20 3:30 PM - 4:45 PM PDT
- Thursday, May 22 10:15 AM - 11:30 AM PDT
The Dev Box customizations feature helps you streamline the setup of cloud-based development environments. Getting developers started on a new project or team can be complex and time-consuming. Customizations let you configure ready-to-code workstations with applications, tools, repositories, code libraries, packages, and build scripts. This article guides you through the process of creating, testing, and editing an image definition file for your dev box using Visual Studio Code (VS Code).
There are two ways to use customizations in Microsoft Dev Box. Team customizations create a shared configuration for a team of developers. User customizations create a personal configuration for an individual developer. The following table summarizes the differences between the two types of customizations.
| Feature | Team customizations | User customizations |
|---|---|---|
| Configure on | Dev box pool | Dev box |
| Customizations apply to | All dev boxes in pool | Individual dev box |
| Easily shareable | Yes | No |
| Customizations file name | Imagedefinition.yaml | myfilename.yaml or Workload.yaml |
| Sourced from | Catalog | Uploaded or from personal repository |
| Supports key vault secrets | Yes | Yes |
Prerequisites
To complete the steps in this article, you must:
- Have a dev center configured with a dev box pool, and dev box project so that you can create a dev box.
- Be a member of the Dev Box Users security group for at least one project.
- Have a catalog attached to the dev center with tasks that you can use in your image definition file. If you don't have a catalog, see Add and configure a catalog from GitHub or Azure Repos.
Permissions required to configure customizations
| Action | Permission/Role |
|---|---|
| Enable project-level catalogs for a dev center. | Platform engineer with write access on the subscription. |
| Enable catalog sync settings for a project. | Platform engineer with write access on the subscription. |
| Attach a catalog to a project. | Project Admin or Contributor permissions on the project. |
| Create an image definition file. | None specified. Anyone can create an image definition file. |
| Add tasks to a catalog. | Permission to add to the repository that hosts the catalog. |
Choose a source for customization tasks
Dev Box tasks can be sourced from tasks built-in to the platform, or custom tasks stored in a catalog. Choose the source that best aligns with your customization needs and project requirements.
Use WinGet and PowerShell built-in tasks Dev Box dev centers support PowerShell and WinGet tasks out of the box; you can get started with these built-in tasks. If your customizations require only PowerShell and WinGet, proceed with creating your customizations file: Create an image definition file.
The WinGet in-built task is not the WinGet executable. WinGet in-built task is based on the PowerShell WinGet CmdLet.
Use a catalog to define custom tasks You can create your own custom tasks. To make custom tasks available to your entire organization, attach a catalog that contains custom task definitions to your dev center. Dev Box supports Azure Repos and GitHub catalogs. Because tasks can only be defined at the dev center, you should store tasks and image definitions in separate repositories.
To learn more about defining custom tasks, see: Create tasks for Dev Box team customizations.
Create image definitions at project level
Using a project can help manage Dev Box resources efficiently. By assigning each developer team their own project, you can organize resources effectively. You can create multiple image definitions in your catalog repository, each in their own folder to target different developer teams under your project.
1. Assign permissions for project admins.
To attach a catalog to a project, you must have Project Admin or Contributor permission for the project. To learn how to assign Project Admin permission, see Grant administrative access to Microsoft Dev Box projects.
2. Enable project-level catalogs
You must enable project-level catalogs at the dev center level before you can add a catalog to a project. To enable the use of project-level catalogs at the dev center level:
In the Azure portal, navigate to your dev center.
In the left menu, under Settings, select Dev center settings.
Under Project level catalogs, select Enable catalogs per project, and then select Apply.

For more information about adding catalogs to projects, see Add and configure a catalog from GitHub or Azure Repos.
Create an image definition file
You can create and test image definition files by using VS Code. In addition to using the built-in tasks, you can use the Microsoft Dev Box extension in VS Code to discover the custom tasks available through your dev center.
Create a dev box (or use an existing dev box) for testing.
On the test dev box, install VS Code and then install the Dev Box extension.
Download an example YAML image definition file from the samples repository and open it in VS Code.
Discover tasks available in the catalog by using the command palette. Select View > Command Palette > Dev Box: List Available Tasks For This Dev Box.

Test customization in VS Code by using the command palette. Select View > Command Palette > Dev Box: Apply Customizations Tasks.

The image definition file runs and applies the specified tasks to your test dev box. Inspect the changes and check the VS Code terminal for any errors or warnings generated during the task execution.
When the image definition file runs successfully, upload it to your catalog.
System Tasks and User Tasks
You can use both System and User tasks in your image definition file. The tasks section of the image definition file is divided into two sections: tasks and userTasks. Both sections share the same parameters based on the task definitions in your catalog.
System tasks: These tasks run as LocalSystem during the provisioning stage of the dev box. They are typically used for system-level configurations, such as installing software or configuring system settings that require administrative privileges.
User tasks: These tasks run as the user after the user's first sign-in to the dev box. They are typically used for user-level configurations, such as installing user-specific applications or configuring user settings under user context. For example, users often prefer to install Python and Visual Studio Code under user context instead of system-wide. Put WinGet tasks in the userTasks section for better results when they don't work under tasks.
Standard users configuring user customizations can only use user tasks, they cannot use system tasks.
Optional: Customize your dev box by using existing Desired State Configuration files
Desired State Configuration (DSC) is a management platform in PowerShell that enables you to manage your development environment with configuration as code. You can use DSC to define the desired state of your dev box, including software installations, configurations, and settings.
You can also use DSC configuration files to set up a dev box, by using a built-in WinGet task.
The following example shows a dev box image definition file that calls an existing WinGet DSC file:
tasks:
    - name: winget
      parameters:
          configure: "projectConfiguration.dsc.yaml"
To learn more, see WinGet configuration.
Configure catalog sync settings for the project
Configure your project to sync image definitions from the catalog. With this setting, you can use the image definitions in the catalog to create dev box pools.
Sign in to the Azure portal.
In the search box, enter projects. In the list of results, select Projects.
Open the Dev Box project for which you want to configure catalog sync settings.
Select Catalogs.
Select Sync settings.
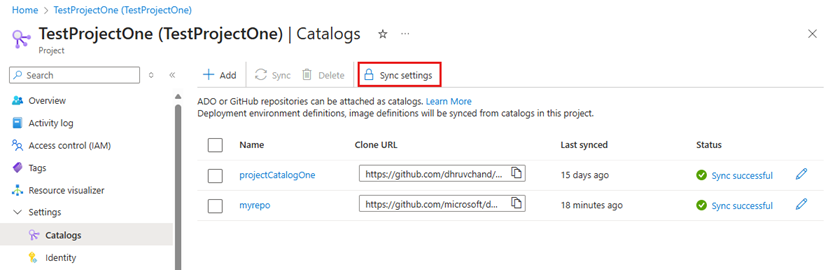
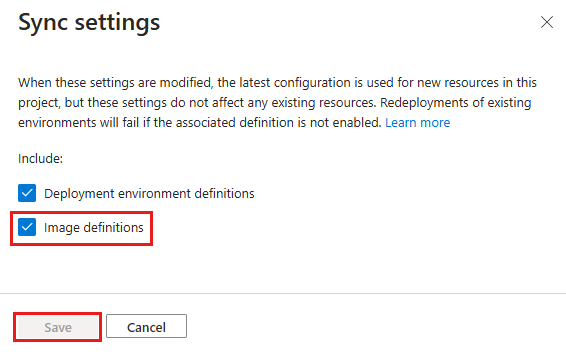
On the Sync settings pane, select Image definitions, and then select Save.


Attach a catalog that contains the definition file
Before you can use a customization file as an image definition, you must attach a catalog that contains the definition file to your dev center or project. The catalog can be from GitHub or Azure Repos.
The Image definitions pane lists the image definitions that your project can access.

For more information about attaching catalogs, see Add and configure a catalog from GitHub or Azure Repos.
Configure a dev box pool to use an image definition
Make customizations available to your development teams by configuring a dev box pool to use a customization file (imagedefinition.yaml). Store the customization file in a repository linked to a catalog in your dev center or project. Specify this file as the image definition for the pool, and the customizations are applied to new dev boxes.
The following steps show you how to create a dev box pool and specify an image definition:
Sign in to the Azure portal.
In the search box, enter projects. In the list of results, select Projects.
Open the Dev Box project with which you want to associate the new dev box pool.
Select Dev box pools, and then select Create.
On the Create a dev box pool pane, enter the following values:
Setting Value Name Enter a name for the pool. The pool name is visible to developers to select when they're creating dev boxes. It must be unique within a project. Definition This box lists image definitions from accessible catalogs and dev box definitions. Select an image definition file. Network connection Select Deploy to a Microsoft hosted network, or use an existing network connection. Enable single sign-on Select Yes to enable single sign-on for the dev boxes in this pool. Single sign-on must be configured for the organization. For more information, see Enable single sign-on for dev boxes. Dev box Creator Privileges Select Local Administrator or Standard User. Enable Auto-stop Yes is the default. Select No to disable an autostop schedule. You can configure an autostop schedule after the pool is created. Stop time Select a time to shut down all the dev boxes in the pool. Time zone Select the time zone that the stop time is in. Licensing Select this checkbox to confirm that your organization has Azure Hybrid Benefit licenses that you want to apply to the dev boxes in this pool. 
Select Create.
Verify that the new dev box pool appears in the list. You might need to refresh the screen.

Create a dev box by using the developer portal
To verify that customizations from the image definition file are applied, create a dev box in the Microsoft Dev Box developer portal. Follow the steps in Quickstart: Create and connect to a dev box by using the Microsoft Dev Box developer portal. Then connect to the newly created dev box and verify that the customizations work as you expected.
You can make adjustments to the customization file and create a new dev box to test the changes. When you're happy that the customizations are correct, you can build a reusable image.
Next step
Now that you have an image definition file, upload it to a catalog and attach the catalog to a project. The image definition file is used to configure and create dev boxes for your development teams.